Database Management System Class 10 Notes – The CBSE has changed the previous textbook and the syllabus of Std. X. The new notes are made based on the new syllabus and based on the New CBSE textbook. All the important Information are taken from the Information Technology Class X Textbook Based on CBSE Board Pattern.
Database Management System Class 10 Notes
Data is most important for any organisation, or in a company; the organisation’s primary objective is to store data, manage data and retrieve data from computers, and this is only possible with database management systems.
Chapter 8: Introduction of Database Management System
A database is an organized collection of data that is maintained electronically. Any kind of data like text, numbers, pictures, videos and files can be stored in a database. This data can be stored, retrieved and edited using software known as a database management system.

Data and Information
- Data – Data is a collection of facts which do not have any meaning. This data is unstructured information such as numbers, text, symbols and images.
- Information – Information depends on data, this information has some meaning. This Information refers to organized and structured data.
Databases and DBMS
- Database – A database is a collection of logically related data items stored in an organized manner, It is also considered as a data bank.
- DBMS (Database Management System) – This software that is used to create, update and retrieve data is known as database management system. Some of the common examples of DBMS are LibreOffice Base, MS Access, Open Office Base, Oracle, MySQL.
Advantages of DBMS
- Organized Storage – In database data are stored in an organized manner, so that retrieval of the data is fast and accurate.
- Data Analysis – In database you can retrive the data based on certain criteria for example average, maximum or minimum value etc.
- Data Sharing – Databases can share the data with other applications.
- Minimal Data Redundancy – In database duplicate data is not allowed, it means that same data will not be repeated in the table.
- Data Consistency – In database if any record is changed in any one of the tables then the same data will update in other tables also.
- Increase Efficiency – In the database the data is organized which helps to retrieve and search data efficiently.
- Increases Accuracy – In the database the data is retrieved accurately from the database.
- Increases Validity – In the database the valid data is being entered and checked by the database.
- Security – Unauthorized access is not allowed in the database.
Data Models
A database can be designed in different ways dependent on data storage. This structure of the database is known as a data model. The data models describe the relationships between the data.
There are different data models such as –
- Hierarchical data model
- Network data model
- Relational data model
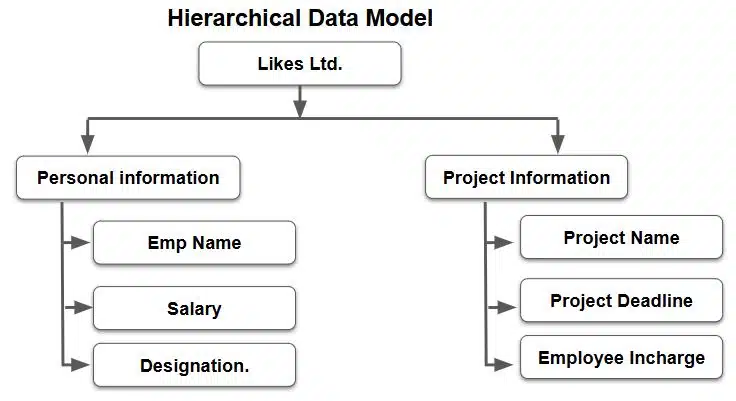
Hierarchical Data Model
In Hierarchical Data Model the data is organized like tree structure and data is stored in the form of a table.
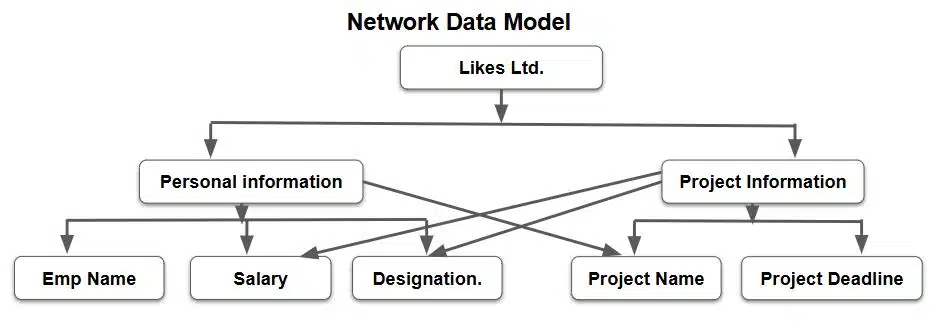
Network Data Model
In this model, multiple records are linked to the same master file. This network model is considered as a tree where the master table present in the bottom and other tables linked to the master table.
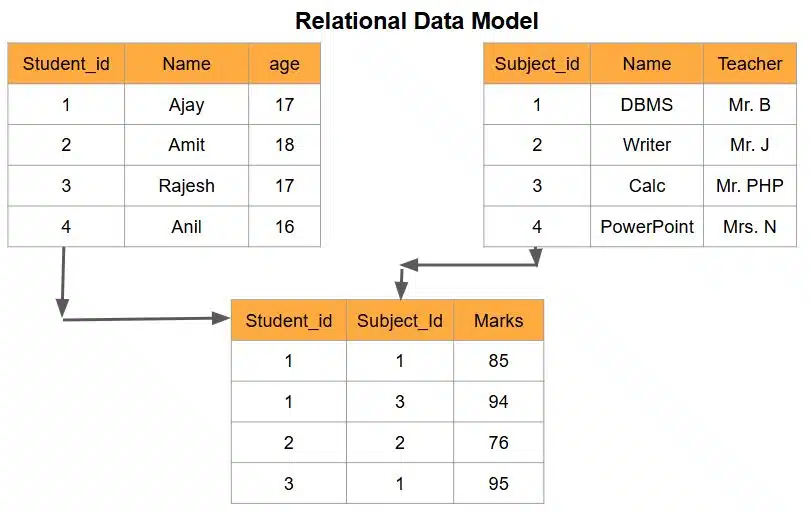
Relational Data Model
In relational data models are based on relationships between two or more tables of the same database. This is the most popular data model.
Relational Database Model
E. F. Codd given the concept of Relational Database Model in 1970. The most popular type of database model is the relational model. In relational database models the data elements are stored in different tables, this table is related through the common fields.
Relational Database Terminology
Some of the common terms used in RDBMS.
- Entity – Entity is a piece of data that is stored in the database, for example student rollno, name and age is the entity of the student record.
- Table – Table is a collection of logically related records, It is organized as a set of columns.
- Field or Columns or attributes – The smallest entity in the database is known as field, a collection of fields is known as record, a collection of records make a table and a collection of tables make a database.
- Data Values – Data values are raw data represented in character, numeric or alphanumeric.
- Record or Row – The collection of data values of all the fields are known as record.
- Primary Key – The field which uniquely identifies a row in a table. The primary key used to be a unique identifier for the table.
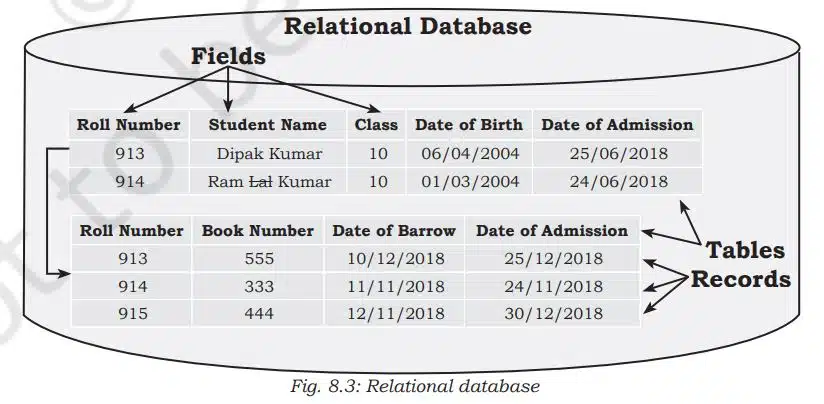
- Relational Database – A relational database is a collection of related tables.
- Foreign Key – The field or a combination of fields of one table can be used to uniquely identify records of another table, then that particular field is known as the foreign key.
- Candidate Key – All the field values that are eligible to be the primary key are the candidate key for that table.
- Alternate Key – One or two fields in the table are made as primary key but others are the alternate key.
Objects of an RDBMS
The database is a collection of object or a feature that is used to store, represent or retrieve data, different types of objects in a database are given below –
- Table – Table is a collection of row and column which is used to store data. The data in the database is first stored in a table.
- Form – A form is used to enter data in a table, form is the interface between database and users, it is an easiest method to enter data in database using user friendly manners. A form consists of a text box, radio button, labels, check box etc.
- Queries – Queries are used to retrieve the desired result from the database.
- Reports – The output of any query in the database may be displayed in the form of reports.
Chapter 9: Starting with LibreOffice Base
Data Types
A data type refers to the type of data that will be stored in that particular field. The memory size of a field varies according to its data type. There are six different types of data type in LibreOffice Base –
- Text Data Types
- Numeric Data Type
- Currency Data Type
- Date Data Type
- Boolean Data Type
- Binary Data Type
Text Data Types
The text data consists of a mix of special characters, numbers, and letters. With text data, no mathematical operations may be carried out. PAN card numbers, names, marks, and other data types are examples of text data.
The lists of various data types that can store textual data –
| Name | Data Type | Description |
|---|---|---|
| Memo | LONGVARCHAR | Memo data type allows to store text data up to 64000 characters. |
| Text(fix) | CHAR | Character data type is used to enter fixed number of characters for example AADHAR NO, ACCOUNT NO, PASSPORT NO etc. |
| Text | VARCHAR | Stores upto the specified length, the number of bytes allocated depends on the number of characters entered by the user. |
Numeric Data Type
Numeric Data type contains numbers. The number can be integer, real, float or double.
| Name | Data type | Signed | Range |
|---|---|---|---|
| Tiny Integer | TYNYINT | No | 0-255 |
| Small Integer | SMALLINT | Yes | -32768 to 32768 |
| Integer | INTEGER | Yes | -2.14×10⁹ to 2.14×10⁹ |
| BigInt | BIGINT | Yes | -2.3×10¹⁸ to 2.3×10¹⁸ |
| Number | NUMERIC | Yes | Unlimited |
| Decimal | DECIMAL | Yes | Unlimited |
| Float | FLOAT | Yes | |
| Real | REAL | Yes | 5×10(-324) to 1.79×10(308) |
| Double | DOUBLE | Yes |
List of different numeric data types are –
Currency Data Type
Currency Data type contains monetary values and can store currencies of different countries.
Date Data Type
This data type is basically used for date and time. There are various formats used to store date and time.
List of various forms of date data types are –
| Name | Description |
|---|---|
| Date | Stores the year, month and day as it is stored in the system. |
| Time | Stores the time of the day as hour, minute and second. |
| Timestamp | Stores date and time information at once. |
Boolean
In boolean data type there are only two values – True or False, This also can be given in multiple formats like Yes/No, True/False, On/Off.
Binary
The binary datatype is used to store digital images and sounds.
Starting with LibreOffice Base
LibreOffice base is a database management software belonging to LibreOffice suite, It is free and open source software for creating and managing data. It also allows you to create a query for retrieving desired results from the database.
Steps for starting LibreOffice Base –
- Step 1: Click on Start > LibreOffice base
- Step 2: In Database Wizard, Click on Create a new database
- Step 3: After Creating a new database, Click on Yes, register the database for me
- Step 4: Click on Finish, Now your database will be created
Creating a Table
After creating a database now you will start working with objects of the database, The first object we are going to create is Create Table. There are two different method to create table –
- Create Table using design View
- Create Table using a Wizard
Creating Table in Design View
- Step 1: Click on Table
- Step 2: Click on Create Table in Design View
- Step 3: Enter Field Name, Field Type and Description
- Step 4: Click on Save
Steps for Creating Table using a Wizard
- Step 1: Click on Table
- Step 2: Click on Use Wizard to Create Table
- Step 3: Select the field which you want
- Step 4: Click on Finish
Chapter 10: Working with Multiple Tables
After creating tables in a database, you can also create relationships between two or more tables to control data redundancy and inconsistency. When you create a relationship between two or more tables then adding or updating a record in one table reflects the changes in all the related tables.
Master table vs Transaction table
If the School wants to manage student fees collection in a database, then they will create two tables, one for Student Details and second for Free details, here the Student Details will be master table and Fee details will be transaction table.
Relationships between Tables
A relationship is a connection between two or more tables that contain data, the relationships between tables are based on a common field. This relationship helps to improve table structures and reduce redundancy of the data.
Types of Relationships
The relationships between two or more tables in a database is based on the number of records, Primarily there are three different types of relationships that can be set up between two or more tables.
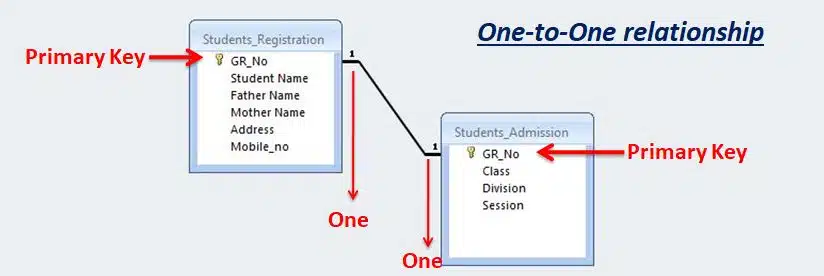
- One-to-One
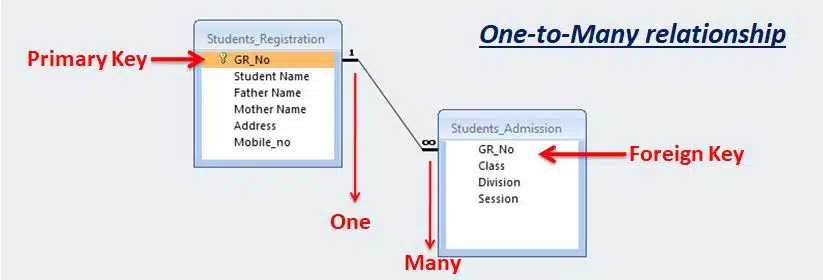
- One-to-many
- Many-to-Many
One-to-One relationship
In a One-to-One relationship, the master table and transaction table both have one record.
One-to-Many relationship
In a One-to-Many relationship, the master table having one record and transaction table having multiple records. This is a very common type of relationship between the tables in the database.
Many-to-Many relationship
In a One-to-Many relationship, the master table has multiple records and the transaction table has multiple records.

Advantages of Relating Tables in a Database
- A relationship helps to prevent data redundancy.
- Relationships between tables help to restrict from entering invalid data in the referenced field.
- It helps to prevent missing data by keeping deleted data from getting out of sync.
- Any update in the master table is automatically reflected in the transaction tables.
Primary Key, Composite Primary Key and Foreign Key in a Database
In the RDBMS data can be integrated using keys. These are Primary Key, Composite Primary Key, and Foreign Key, Key are used to make the relationship between the tables.
- Primary Key – This unique field is called the Primary Key (PK). primary key is a field or a set of fields that uniquely identify each record in a table. A primary key must be unique and cannot contain null values.
- Composite Primary Key – A composite primary key is a primary key that consists of two or more fields that together uniquely identify each record in a table.
- Foreign Key – Foreign key is used to link one table to another table using referencing where the first table will be primary key, and the second table will be foreign key. It is used to make relationship between two tables.
Referential Integrity
As per the principle rule of the database, no unmatched foreign key values should exist in the database. Referential integrity processes concentrate on ensuring data consistency and the link between tables.
LibreOffice Base gives us following four options to maintain referential integrity –
- No action – This is default option, this option states that no update or delete are allowed in the master table if any related record exists in the transaction table.
- Update cascade – This option allows to delete or update the referenced field but the related records that are also available in any transaction tables will also be deleted or updated.
- Set NULL – This option assigns NULL value to all the records in the master record that are deleted or updated.
- Set default – This option assigns a fixed default value to all the related fields if the master record deleted or updated.
Chapter 11: Queries in Base
In the database data is stored in an organized manner which helps to retrieve data quickly and accurately. To search and retrieve the desired data from the database, we have to give its specifications to DBMS. Such specifications are given to the database in the form of queries.
Query
A query is the most important feature of DBMS. Query is a request for data, query helps to retrieve and display data from one or more tables in a database. This is done by giving criteria to the DBMS.
A query can be created in three ways –
- Using a Wizard
- In Design View
- In SQL view
Database Languages
Database Languages having two type:
- DDL (Data Definition Language)
- DML (Data Manipulation Language)
DDL Statements:
- Create: Using this statement, a database or set of tables can be created.
- Alternate: This statement is used to change the table’s structure.
- Drop: This statement is used to remove database objects from the system.
DML statements:
- SELECT: The statement “SELECT” is used to get data from the database.
- INSERT: The statement “INSERT” is used to add a new record to the database.
- DELETE: The database can be cleaned out by using the statement DELETE.
- UPDATE: This statement is used to modify the database’s information.
Select Statement
Select statement is most important for retrieving and for displaying data from a database.
Syntax of Select Statement is –
SELECT * FROM <TABLENAME>;
The SELECT statement has many optional clauses:
- WHERE specifies which rows to retrieve.
- ORDER BY specifies an order in which to return the rows.
Question 1 – Write a Query to display all record from the table;
Table Name – product
| Product_No | Product_Name | Price | Quantity |
| 25 | Soap | 40 | 80 |
| 31 | Powder | 80 | 30 |
| 45 | Shampoo | 250 | 25 |
| 52 | Soap Box | 120 | 100 |
Answer: Select * from product;
Question 2 – Write a Query to display product name from the table;
Answer: Select Product_Name from product;
Question 3 – Write a Query to display Product_Name and Price from the table;
Answer: Select Product_Name, Price from product;
Question 4 – Write a Query to find the total no of quantity available in table;
Answer: Select sum(quantity) from product;
Question 5- Display the total amount of each item. The amount must be calculated as the price multiplied by quantity for each item.
Answer: Select Product_No, Product_Name, Price * Quantity from product;
Question 6- Write a Query to display the product whose price is less than 90
Answer: Select * from product where price < 90;
Question 7- Write a Query to find the total amount of the Shampoo product;
Answer: Select Price*Quantity from product where Product_Name = ‘Shampoo’;
Question 8- Write a Query to display the data whose quantity is equal to 80.
Answer: Select * from product where quantity = 80;
Question 9- Write a Query to display a list of Products whose Price between 40 to 120.
Answer: Select * from product where Price >= 40 and Price <= 120;
Question 10- Write a Query to display the list of Product_Name in alphabetical order.
Answer: Select * from product order by Product_Name ASC;
Question 11- Write a Query to display the list of Price in descending order.
Answer: Select * from product order by Price DESC;
UPDATE statement
Update statement is used to update existing records present in database. The updated statement will apply using WHERE clause.
Syntax of Update Statement –
UPDATE <table name> SET = value [, column_name = value ...] [WHERE ];
Table Name – product
| Product_No | Product_Name | Price | Quantity |
| 25 | Soap | 40 | 80 |
| 31 | Powder | 80 | 30 |
| 45 | Shampoo | 250 | 25 |
| 52 | Soap Box | 120 | 100 |
Question – Write a Query to update the price of Shampoo in the product table.
Answer: Update product Set Price = 300 where Price = 250;
Question – Write a Query to update the Quantity of Powder in the product table.
Answer: Update product Set Quantity = 50 where Product_Name = ‘Powder’;
Chapter 12: Forms and Reports
LibreOffice Base provides the Form feature for data entry purposes and report feature for displaying the data.
Form
A form is a database object with a user-friendly interface that allows data entry and viewing in a visually attractive and accessible method. It serves as the front end for entering and editing data into any database.
There are two ways to create a form:
- Using a wizard
- Using the Design View
Creating a Form Using a Wizard
Creating a Form Using a Wizard is the simplest way to create a form in LibreOffice base. To create a form using wizard, follow the following steps.
- Step 1: Open Database
- Step 2: Click on Use Wizard to Create Form
- Step 3: Select the fields of your form
- Step 4: Decide if you want to set up a subform
- Step 5: Arrange the controls on your form
- Step 6: Select the data entry mode
- Step 7: Apply Style
- Step 8: Set the name of the form
- Step 9: Click on Finish
Forms Control Toolbar – This toolbar contains various controls that can be added to the form.
Records Toolbar – The Records toolbar contains the navigation control buttons in the extreme left.
Creating Reports using wizard
You can create report from the Report using a wizard. To create a report, follow the following steps –
- Step 1: Open Database
- Step 2: Click on Use Wizard to Create Report
- Step 3: Select, Which fields do you want to have in your report
- Step 4: Enter, How do you want to label the field
- Step 5: Add grouping levels in the Report Wizard
- Step 6: Select sort option according to the data
- Step 7: How do you want your report to look
- Step 8: Describe how you want to processed
- Step 9: Click on Finish
Employability skills Class 10 Notes
- Unit 1- Communication Skills Class 10 Notes
- Unit 2- Self-Management Skills Class 10 Notes
- Unit 3- Basic ICT Skills Class 10 Notes
- Unit 4- Entrepreneurial Skills Class 10 Notes
- Unit 5- Green Skills Class 10 Notes
Employability skills Class 10 MCQ
- Unit 1- Communication Skills Class 10 MCQ
- Unit 2- Self-Management Skills Class 10 MCQ
- Unit 3- Basic ICT Skills Class 10 MCQ
- Unit 4- Entrepreneurial Skills Class 10 MCQ
- Unit 5- Green Skills Class 10 MCQ
Employability skills Class 10 Questions and Answers
- Unit 1- Communication Skills Class 10 Questions and Answers
- Unit 2- Self-Management Skills Class 10 Questions and Answers
- Unit 3- Basic ICT Skills Class 10 Questions and Answers
- Unit 4- Entrepreneurial Skills Class 10 Questions and Answers
- Unit 5- Green Skills Class 10 Questions and Answers
Information Technology Class 10 Notes
- Unit 1- Digital Documentation Class 10 Notes
- Unit 2- Electronic Spreadsheet Class 10 Notes
- Unit 3- RDBMS Class 10 Notes
- Unit 4 – Maintain Healthy Safe and Secure Working Environment Class 10 Notes
Information Technology Class 10 MCQ
- Unit 1- Digital Documentation Class 10 MCQ
- Unit 2- Electronic Spreadsheet Class 10 MCQ
- Unit 3- RDBMS Class 10 MCQ
- Unit 4 – Maintain Health Safety and Security at Workplace Class 10 MCQ
Information Technology Class 10 Questions and Answers
- Unit 1- Digital Documentation Class 10 Questions and Answers
- Unit 2- Electronic Spreadsheet Class 10 Questions and Answers
- Unit 3- RDBMS Class 10 Questions and Answers
- Unit 4 – Maintain a healthy safe and secure working environment class 10 questions
Disclaimer: We have taken an effort to provide you with the accurate handout of “Database Management System Class 10 Notes IT 402“. If you feel that there is any error or mistake, please contact me at anuraganand2017@gmail.com. The above CBSE study material present on our websites is for education purpose, not our copyrights. All the above content and Screenshot are taken from Information Technology Class 10 CBSE Textbook and Support Material which is present in CBSEACADEMIC website, This Textbook and Support Material are legally copyright by Central Board of Secondary Education. We are only providing a medium and helping the students to improve the performances in the examination.
For more information, refer to the official CBSE textbooks available at cbseacademic.nic.in
good notes
IF YOU HAVEN’T STUDIED ANYTHING JUST LISTEN MY ADVICE READ THIS NOTES I GUARENTEE YOU 45+/50 JUST STUDY FROM THE NOTES PROVIDED BY THIS WEBSITE
I Need to purchase
You can buy below textbook, try to follow NCERT textbook only.
IT NCERT Textbook: https://amzn.to/4lRPc4B
Employability Skills Book: https://amzn.to/4lTKjrN