Electronic Spreadsheet Class 10 Notes – The CBSE has changed the previous textbook and the syllabus of Std. X. The new notes are made based on the new syllabus and based on the New CBSE textbook. All the important Information are taken from the Information Technology Class X Textbook Based on CBSE Board Pattern.
The revised syllabus includes LibreOffice in Class 10 instead of OpenOffice.
Electronic Spreadsheet Class 10 Notes
For any company or organisation, the data analysis is very important, and the spreadsheet is one of the best software for data analysis. In this chapter we will learn how to analyse the data using LibreOffice Calc.
Chapter 4: Analyse Data using Scenarios and Goal Seek
1. Consolidation Data
Sometimes we want to combine data from multiple sheets for analysing purposes; this you can do with consolidation of data. Consolidation of the data helps to run multiple raw data to summarise data easily using functions like sum, count, average, max, min, product, etc.
Definition: Consolidate is a function which is used to combine data from the multiple sheets into one place to summarize the information.
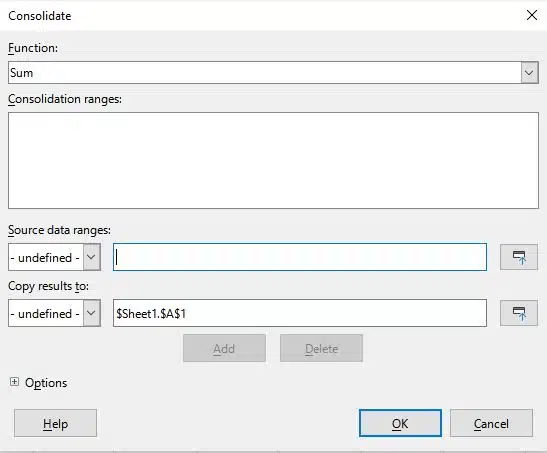
Steps to consolidate the data are as follows –
- Step 1: Open Spreadsheet
- Step 2: Choose Data > Consolidate dialog box and select the function
- Step 3: Click on Source data area
- Step 4: Select the source range or type the cell address
- Step 5: Click on Add button
- Step 6: Select additional range and click Add
- Step 7: Specify where you want to save the result using Copy results to box
- Step 8: Press Ok
2. Groups and Subtotals
Groups in LibreOffice – Group and Outline data is used when we want to group rows or columns together so that one can collapse (-) to hide it or expand (+) it using a single click on it. To select the data to be grouped Data > Group and Outline
The subtotal tool in Calc creates a group of data automatically and applies common functions like sum and average on the grouped data. The subtotal will display the data in the form of sorting in ascending or descending order.
Steps how to use subtotal –
- Step 1: Click on Data > Subtotals from menu bar
- Step 2: Select Column in which you want to use subtotal
- Step 3: Select functions like sum, average, count, max, min etc.
- Step 4: Click Ok.
3. What-if Scenarios
What-if scenario is a set of values that can be used with in the calculations in the spreadsheet. A name is given to the scenario and several scenarios can be created on the same sheet. It is used to explore and compare various alternatives depending on changing conditions. This tool is used to predict the output while changing the inputs which reflects the output and thus one can choose the best plan of action based on it.
Definition: The What-if scenario is a powerful technique, scenario is a set of cell values which is used within the calculation.
Use following steps to create scenarios in LibreOffice Calc-
- Step 1: Select the cells where you want to apply scenarios
- Step 2: Click Tools > Scenarios
- Step 3: Enter name of Scenarios
- Step 4: Click Ok Button.
4. What-if Analysis Tool
The what-if tool is a planning tool for possible outcomes; you can open Multiple Operations from Data > Multiple Operations. whereas it uses a drop-down list to display the result based on the input rather than displaying the output in the same cells as the input, but the Multiple Operations tool creates a formula array to display the list of results.
Use following steps to create What-if analysis tool –
- Step 1: Enter the data in the cells
- Step 2: Create an array of input values on the basis of output what you generage
- Step 3: Select the cell range of input array and output array
- Step 4: Click on Data > Multiple Operations
- Step 5: Enter the cell address in formula box and Column input cell
- Step 6: Click on Ok
5. Goal Seek
Goal Seek comes under What-if Analysis tools. Goal seek helps to find specific output from the given input. Goal seek can find the correct input when only the output is known.
Example – Suppose, you require a loan. You are aware of the amount you wish to borrow, you also know the interest rate of the Bank, and how much you can afford to pay each month. To find out what time you’ll need to get in order to reach your loan target, use Goal Seek.
User following steps to create goal seek –
- Step 1: Enter Principal amount, time, rate of interest in the worksheet
- Step 2: Write a formula for Simple interest
- Step 3: Click on Tools > Goal Seek
- Step 4: Place the cursor on the Variable cell box and click on the cell
Chapter 5: Using Macros in Spreadsheet
1. Macro in LibreOffice Calc
Some times we perform the same task multiple times such as using formulas in different places, sometimes we type the same information multiple times like school Name, address, contact number etc, Micro is a tool which helps the user to do the task easily.
Definition: A Macros is a set of commands for keystrokes that we can store for later use.
a. Recording a Macro
Macro is a sequence of actions such as keystrokes and clicks that can be recorded and then run as per the requirement. Macro recording can be enabled using the tools option on the main menu bar by selection Tools > Option > LibreOffice > Advanced.
Note: There are two different options which are not checked, before starting Macro you have to enable these two options.
In Macro you can record many thing but there are some action which will not record –
- Opening of windows
- Transferring action from one window to another window.
- Window switching
- In Spreadsheet if actions are not related to content
- Selections are recorded only if they are done by using the keyboard, but not when the mouse is used.
- This macro you can use only in Calc, Writer and Excel
Follow the steps given below to record a macro –
- Step 1: Click on Tools > Macros > Record Macro
- Step 2: Start doing actions which you want to record
- Step 3: After completing your actions Click on Save Macro
- Step 4: Change the name of Macro
- Stet 5: Click on Save button
Rules for naming a Macro –
- Begin with a letter
- Not contain spaces
- Not contain special characters except for underscore (_)
b. Running a Macro
To run the macro in LibreOffice Calc, you can click on Tools > Macros > Run Macro.
Advantages of using Macro in LibreOffice Calc
- The macro can use multiple time
- The macro reduce time and improve the work speed
- The macro can interact more quickly as compare to function
- The macro saves the effort of remembering and typing the formulas.
Chapter 6: Linking Spreadsheet Data
In this chapter we are going to learn how to create multiple sheets and we are also going to understand how to link the data in multiple sheets and how to organize the data properly.
1. Setting up Multiple Sheets (Insert New Sheets)
When you open LibreOffice Calc, you will find the default sheet “Sheet1”. There are multiple ways to insert a new sheet.
- Select Insert > Sheet from menu bar
- Right click on tab and select Insert Sheet
- Click on the Add Sheet by clicking on the (+) sign located on the left side.
2. Cell Reference
A worksheet cell or range of cells that may be used in a formula for calculating values is referred to as a cell reference. We can link the data in multiple sheets using cell reference. This can be done using two different way –
- Creating reference to other sheets/documents by using keyboard and mouse
- Linking external data.
Creating Reference to Other Sheets by Using Keyboard and Mouse
When we want to add a cell reference from one sheet to another sheet then you have to click the cell where the formula is to be entered, then input the formula with the = (equal sign) and select the cell from the difference sheet. For example, to refer a cell C4 of sheet named Term1 we will type: $‛Term 1’.C4
Note: Single quotes (‘ ’) are used as there is a space between Term and 1 in the sheet name.
Creating Reference to Other Documents by Using Keyboard and Mouse
It is possible to create the referencing across different spreadsheet files using LibreOffice Calc. This type of referencing is used to find the summary of the report using hyperlinks.
To refer to a cell in a different spreadsheet we write in single quotes the path of the file followed by #$ then the name of the sheet followed by a . (dot) and then the cell address. For example: ‘file:///C:/Users/ADMIN/Documents/X-A.ods’#$Result.C4
Note : The path of a file has three forward slash ///. If filenames have space inside the name then single quotes (‘ ‘) are used.
3. Hyperlinks to the Sheet
Hyperlinks are used to jump to a document stored at a different location from within a document. . Hyperlinks help to jump from a sheet in the same spreadsheet, different spreadsheet or a website by creating a hyperlink.
a. Relative and Absolute Hyperlinks
There are two different types of hyperlinks –
- Absolute Hyperlink – An absolute hyperlink keeps track of the entire location where the file is kept. Absolute hyperlinks will not work if the file is removed from the specified location. C:\Users\ADMIN\Downloads\try
- Relative Hyperlink – The only way a relative link will break is if the start and target locations move in relation to one another. For example: Admin\Downloads\ try.ods is a relative hyperlink as it is dependent on the current location and thus the folder admin is searched where the active spreadsheet is being stored.
4. Linking to External Data
Internet web pages are a rich source of information, this information is stored in a Table in tabular format. LibreOffice Calc helps to import tables from HTML pages into Calc using the External Data Dialog box.
Steps to Inserting data from External Data Dialog box –
- Step 1: Open Spreadsheet where you want to insert external data
- Step 2: Select Sheet > External links
- Step 3: Browse or Drop Down the External Data Source
- Step 4: Press Ok.
a. Linking to Registered Data Sources
We may connect spreadsheet documents to databases and other data sources using LibreOffice Calc. It is necessary to register the data source with LibreOffice.
Data source which you can use to import data in LibreOffice are –
- LibreOffice Base
- ODF Spreadsheet
- HTML Documents
- Notepad File
- XML
LibreOffice Calc allow to share spreadsheet to more than one user at a time. The shared spreadsheet can be edited and accessed by multiple people and allow them to make changes simultaneously on it.
1. Sharing Spreadsheet
You can share the spreadsheet to multiple users to work in collaboration with the people. To share the spreadsheet you can click on Tools > Share Spreadsheet from the menu bar. This will open the share document dialog box and you can enable or disable sharing option.
When you save a shared spreadsheet, from the following any one situations may occur –
- If two or more users are working simultaneously and their changes do not clash. A notification indicating that the spreadsheet has been updated with modifications.
- The resolve conflict dialog window will pop up if there are any conflicts with the changes.
- If any issue is there, the shared spreadsheet cannot be saved by another user without resolving issues.
- If another user is trying to resolve disputes, then you will receive notification that the file is locked.
2. Recording Changes (Track Change)
Calculus has the ability to trace which data was modified, when it was modified, by whom, and in which cell it is modified using record change. Record change helps to find the usual changes made by the other user, such as text additions, text alterations, deletions and usual formatting.
Steps for starting recording changes option
- Step 1: To enable the Record changes, first disable the shared mode
- Step 2: Click on Edit > Track Changes > Record
- Step 3: Start editing the worksheet
a. Reviewing Changes – View, Accept or Reject Changes
Once the spreadsheet is edited and saved by the users, now you will find accept or reject options in the Edit > Track Changes > Manage in menu bar to prepare the final spreadsheet.
3. Merging Worksheet
Users apply the copy and paste method to combine the sheet data, however merging the sheets is a smarter way to take their data together into a single sheet in LibreOffice Calc.
Follow the following steps to merge document –
- Step 1: Open Spreadsheet
- Step 2: Click on Edit > Track Changes > Merge Document
- Step 3: Select spreadsheet file which you want to merge
- Step 4: Click on Accept All
Note: The worksheet’s modifications from various authors are indicated by different colors.
4. Comparing Documents
To compare two workbooks and track the differences between them line by line, use Spreadsheet Compare. LibreOffice Calc provides a facility to compare two documents.
Steps to comparing document in LibreOffice Calc
- Step 1: Click Edit > Track Changes > Compare Document
- Step 2: Open the Compare to dialog window, and select the .ods file
- Step 3: Manage the Changes based on accept/reject the changes
- Step 4: Click on Close button
Employability skills Class 10 Notes
- Unit 1- Communication Skills Class 10 Notes
- Unit 2- Self-Management Skills Class 10 Notes
- Unit 3- Basic ICT Skills Class 10 Notes
- Unit 4- Entrepreneurial Skills Class 10 Notes
- Unit 5- Green Skills Class 10 Notes
Employability skills Class 10 MCQ
- Unit 1- Communication Skills Class 10 MCQ
- Unit 2- Self-Management Skills Class 10 MCQ
- Unit 3- Basic ICT Skills Class 10 MCQ
- Unit 4- Entrepreneurial Skills Class 10 MCQ
- Unit 5- Green Skills Class 10 MCQ
Employability skills Class 10 Questions and Answers
- Unit 1- Communication Skills Class 10 Questions and Answers
- Unit 2- Self-Management Skills Class 10 Questions and Answers
- Unit 3- Basic ICT Skills Class 10 Questions and Answers
- Unit 4- Entrepreneurial Skills Class 10 Questions and Answers
- Unit 5- Green Skills Class 10 Questions and Answers
Information Technology Class 10 Notes
- Unit 1- Digital Documentation Class 10 Notes
- Unit 2- Electronic Spreadsheet Class 10 Notes
- Unit 3- RDBMS Class 10 Notes
- Unit 4 – Maintain Healthy Safe and Secure Working Environment Class 10 Notes
Information Technology Class 10 MCQ
- Unit 1- Digital Documentation Class 10 MCQ
- Unit 2- Electronic Spreadsheet Class 10 MCQ
- Unit 3- RDBMS Class 10 MCQ
- Unit 4 – Maintain Health Safety and Security at Workplace Class 10 MCQ
Information Technology Class 10 Questions and Answers
- Unit 1- Digital Documentation Class 10 Questions and Answers
- Unit 2- Electronic Spreadsheet Class 10 Questions and Answers
- Unit 3- RDBMS Class 10 Questions and Answers
Disclaimer: We have taken an effort to provide you with the accurate handout of “Electronic Spreadsheet Class 10 Notes IT 402“. If you feel that there is any error or mistake, please contact me at anuraganand2017@gmail.com. The above CBSE study material present on our websites is for education purpose, not our copyrights. All the above content and Screenshot are taken from Information Technology Class 10 CBSE Textbook and Support Material which is present in CBSEACADEMIC website, This Textbook and Support Material are legally copyright by Central Board of Secondary Education. We are only providing a medium and helping the students to improve the performances in the examination.
For more information, refer to the official CBSE textbooks available at cbseacademic.nic.in
I score 50/50 in board exam
THANK YOU SOO MUCH !!!!
Love you all
Wow explanation I score 50/50.
I LOVE THIS WEBSITE
THANKS YOU SOOO MUCH !!
IF YOU HAVEN’T STUDIED ANYTHING JUST LISTEN MY ADVICE READ THIS NOTES I GUARENTEE YOU 45+/50 JUST STUDY FROM THE NOTES PROVIDED BY THIS WEBSITE
Very useful study at last moment…. Like very veryyy great excellent notes
very nice
good
Everyone, all the best for your tomorrow’s exam 😅
thankyou
Thanks
Literally I study this notes 1 day before exam and score 45+
I love this notes it is so helpful ????????????????????
Bhai board ya school exam me, steps puchne vaale question aate hain kya ??
Board me ate hai khabi khabi
Best notes and also competing all points