Teachers and Examiners (CBSESkillEduction) collaborated to create the Multimedia Class 11 Notes. All the important Information are taken from the NCERT Textbook Web Application (803) class 11.
Multimedia Class 11 Notes
Multimedia is the result of combining the words multi (meaning more than one) and media (meaning a mode of transmitting information). Multimedia thus refers to the integrated use of multiple contemporaneous media. The following media types could be a part of it –
- Text
- Graphics and Images
- Audio
- Video
- Animation
Attractions in using Multimedia Technology
- Yielding Simplicity and Ease of use
- Interactive Interface
- Better Understanding of the Content
- Cost Effectiveness
- Having Fun element
Various open source tools for image editing
- GIMP (Windows, Linux, OSX)
- Fotor (Windows, OSX, Android, Online)
- Fooflexer (Online)
- Snapseed (Android, iOS)
- Paint.net (Windows)
- Autodesk Pixlr (Windows, OSX, iOS, Android, Online)
- Picasa (Google’s photo manager: Windows, OSX)
GIMP as a Multimedia Tool for Image Manipulation
GIMP is an open source software suite to create, edit, enhance and manipulate images. The first version of the GIMP (x0.54) was written by Peter Mattis and Spencer Kimball, students at Berkeley, back in 1996.
Few attractive features of GIMP
- Software suite of painting and drawing tools with various brushes, a pencil, an airbrush, cloning, etc.
- Paint tools supporting high-quality anti-aliasing.
- Multiple Layers and channels for image manipulations.
- Transformation tools including rotate, scale, shear and flip.
- A procedural database for calling internal GIMP functions from external programs such as Script-Fu and Python-Fu.
- Advanced scripting capabilities.
- Multiple undo or redo effects on images if sufficient disk space available.
- Support for various file formats, including GIF, JPEG, PNG, TIFF, TGA, PS, PDF, PCX, BMP, XPM, and MPEG etc.
- A variety of Selection tools, including rectangle, ellipse, intelligent scissors etc.
- Plug-ins supporting easy addition of new file formats and filters.
GIMP Tool Box
GIMP has an encircling tool suite, to perform a variety of image manipulations, selection and enhancement operations.
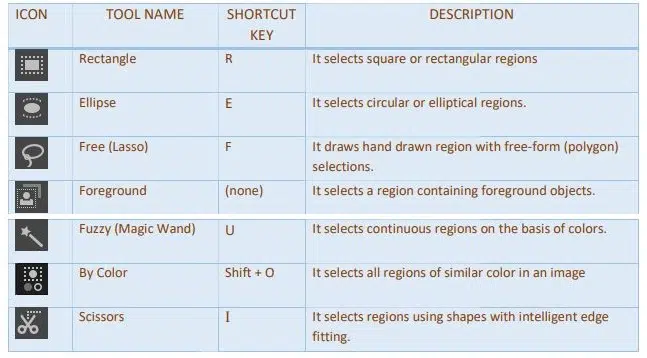
Selection Tool
With the help of selection tools, it is possible to pick out certain areas or regions of an image’s current layer for manipulation. Any action taken by the user after making a selection will only affect the region that the selection covers.
− Clicking tool icon in the Toolbox
− Tool Menu Bar (Tools Selection Tools Rectangle Select/or any other select)
− Shortcut keyboard key
The selection tools are listed in Table below:
Tool Options
The most commonly associated features with selection tools are modes, antialiasing and feather edges.
The way that a new selection interacts with an existing selection is controlled by the mode. Replace, Add, Subtract, and Intersection are some of the modes that are available with Selection tools.
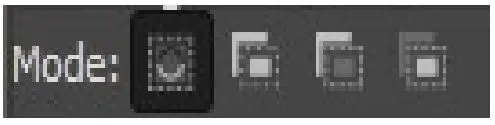
- Replace mode will cause existing selection is replaced by new selection.
- Add mode will cause new selection to be added to existing selection
- Subtract mode will remove the new selection from existing selection.
- Intersection mode will overlap the new selection with existing selection i.e. final selection contains the area common to both the selections.
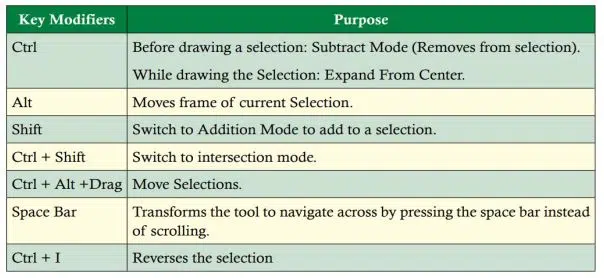
Key identifiers with Modes in Selection Tools
Using Selection Tools
The steps to execute selection tools on images are listed below –
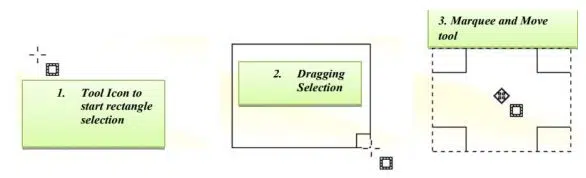
Step 1 : Click “File” then “Open” to open an image from the computer drive.
Step 2 : Click on the selection tool icon in GIMP’s toolbox. Alternatively, the selection tool could be chosen by selecting “Tools” from the program’s menu, and then clicking the desired “Selection tools”. The chosen tool is dragged over the current image to select the desired area.
Step 3 : Once the area has been selected, a boundary (rectangle/ellipse/marquee/ etc.) is visible around the selected portion.
Step 4 : Selected portion is used for further image manipulations and other operations.
Rectangle Select
The most popular tool for selecting rectangular sections of the active layer is the rectangle, which builds rectangular or square selection frames around the image with tiny squares in each corner.
Ellipse Select
By drawing the circular or elliptical boundaries on an image, the Ellipse Selection tool is used to select circular or elliptical sections.
Free Select
In the picture window, the Free Select (Lasso) tool uses mouse clicking and dragging to trace the selection shape. Release of the mouse button completes the action.
Intelligent Scissors
Intelligent Scissors automatically picks a portion of an image. It takes design cues from path and lasso tool functionalities.
The boundary around the region to be selected is made by connecting the nodes or anchor points that were mouse-clicked at the edges.
Foreground Select
By removing foreground from the current image, it performs selection. When the foreground and background have vividly different colour saturations, this tool performs better. In essence, it combines two distinct tools:
Use the lasso tool to choose a foreground region (similar to the Free Select tool) Use the paintbrush tool to paint over a selection to show the colour in the foreground.
Fuzzy Select
A tool called Fuzzy Select uses colours. The “magic wand” technique, also known as fuzzy selection, is used to choose portions of an image that have a similar colour component. The basis for this tool’s usefulness is its analysis of the RGB colour components of the pixels it clicks on. Selecting the proper beginning place is crucial.
By Color Select
Regardless of their placement in the image, all pixels with identical colour components are taken into account when making a selection based on colour. In contrast to the fuzzy tool, the related pixels are automatically identified even if they are obscured by other colours.
PAINT TOOLS
Additionally, you can choose a paint tool from the Paint Tool tab or by choosing an icon in the toolbox. Keyboard shortcuts are also an option. Table Paint Tools contains a list of these tools’ features. The fundamental brushes and colour selection options for the Paint tools are the same for both the normal palette and a gradient. There are numerous painting modes supported by the Paint tools.
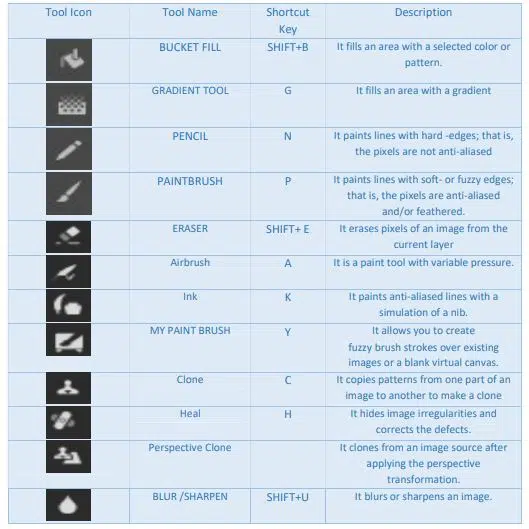
Smudging and Stamping for images
Smudge Tool
To smudge colour pixels on a chosen layer, use the smudge tool. Smudging is used to blur the image, hide objects, ease colour transitions, and create textures. smudge When a smudge tool is used on a picture, it chooses a colour from the palette and combines it with the other colours already there.
Clone Tool
The clone tool is used to duplicate the chosen areas of an image or to copy the pixels from those portions to a destination area that the user wants to cover. It copies from a source image using the currently active brush. It can be used for many different things, but one of its most well-known uses is to fix digital photos or photographs by adding painted pixels from a chosen location.
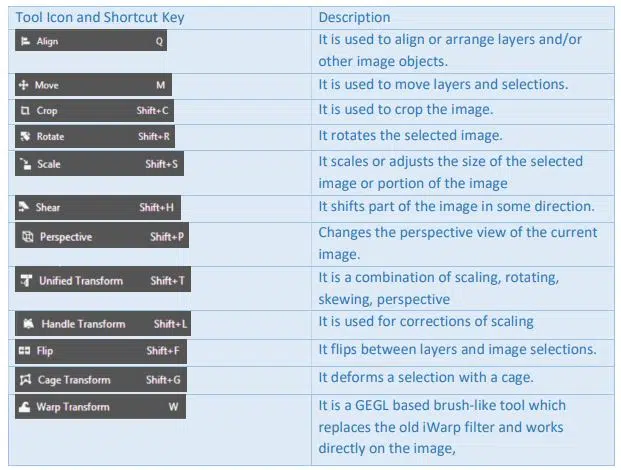
Transform Tools
The display of a picture or a specific aspect inside an image is frequently changed via transform tools.
There are nine of these tools, and each one offers a wide range of functionality and tool possibilities.
Edge Detection Filters
GIMP also renders edge-detecting filters for searching boundaries between various colors of an image based on gradient calculus methods.
Employability Skills Class 11 Notes
- Unit 1 : Communication Skills – III
- Unit 2 : Self-Management Skills – III
- Unit 3 : Information and Communication Technology Skills – III
- Unit 4 : Entrepreneurial Skills – III
- Unit 5 : Green Skills – III
Employability Skills Class 11 MCQ
- Unit 1 : Communication Skills – III
- Unit 2 : Self-Management Skills – III
- Unit 3 : Information and Communication Technology Skills – III
- Unit 4 : Entrepreneurial Skills – III
- Unit 5 : Green Skills – III
Employability Skills Class 11 Questions and Answers
- Unit 1 : Communication Skills – III
- Unit 2 : Self-Management Skills – III
- Unit 3 : Information and Communication Technology Skills – III
- Unit 4 : Entrepreneurial Skills – III
- Unit 5 : Green Skills – III
Web Application Class 11 Notes
- Networking and Internet Class 11 Notes
- Website Development using HTML and CSS Class 11 Notes
- Multimedia Class 11 Notes
- JavaScript Class 11 Notes
Web Application Class 11 MCQ
- Network and Internet Class 11 MCQ
- Web Designing with HTML and CSS MCQ Questions
- GIMP Class 11 MCQ Questions
- JavaScript Class 11 MCQ