Data Entry and Keyboarding Skills Class 9 Notes provide a clear understanding of typing techniques, keyboard functions, accuracy, and speed improvement methods. These notes are designed to help students build practical skills and prepare effectively for exams.
Data Entry and Keyboarding Skills Class 9 Notes
This unit will cover a variety of key types, typing ergonomics, finger placement on the keyboard in accordance with the touch-typing method, and the usage of typing software to learn keyboarding skills.
Keyboarding Skills
What is keyboard?
Keyboard is the most common text-based input device. Computer keyboards are similar to electronic typewriter a keyboard generally has more than 100 keys. The typing speed can be measure using Word Per Minute.
What is keyboarding skill?
Keyboarding skills help the user to understand the keyboard layout and its function. If any person has a good keyboarding skill, then he/she can type the content smoothly using a keyboard.
What is Touch Typing Method?
The touch-typing method is a way of typing that does not require the user to locate keys. There is no need to search for the key while typing.
Different types of keys in keyboard
A computer keyboard contains the following types of keys –
- Alphanumeric keys – All of the alphabet (A-Z) and numbers (0-9) on the keyboard.
- Punctuation keys – All of the keys associated with punctuation, such as the comma (,), period (.), semicolon (;), brackets ([]), and parenthesis ({ }) and so on. Also, all of the mathematical operators such as the plus sign (+), minus sign (-), and equal sign (=).
- Alt key – Short for Alternate, this key is like a second control key.
- Arrow keys – There are four arrow keys to move the cursor (or insertion point) up (↑), down (↓), right (→), or left (←). Arrow keys can be used in conjunction with the
- Shift or Alt keys – To move the cursor in more than one position at a time.
- Backspace key – Deletes the character just to the left of the cursor (or insertion point) and moves the cursor to that position.
- Caps Lock key – It is a toggle key, which when activated, causes all alphabetic characters to be uppercase.
- Ctrl key – The control key is used in conjunction with other keys to produce control characters. The meaning of each control character depends on which program is running.
- Delete key – The Del key deletes the character at the current cursor position, or the selected object, but does not move the cursor. For graphics-based applications, the delete key deletes the character to the right of the insertion point.
- Enter key or Return key – It is used to enter commands or to move the cursor to the beginning of the next line.
- Esc key – The Escape key is used to send special codes to devices and to exit (or escape) from programs and tasks.
- Function keys – Special keys labelled F1 to F12. These keys have different meaning depending on which program is running.
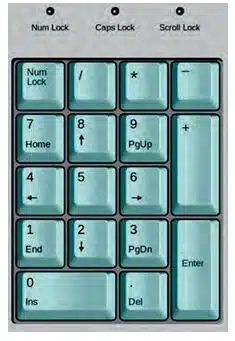
What is numeric keypad?
Numeric keypad is used when large amount of numeric data is to be entered. This keypad is just like a simple calculator. It is normally located on the right-hand side of computer keyboard.
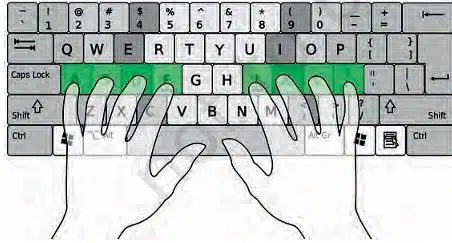
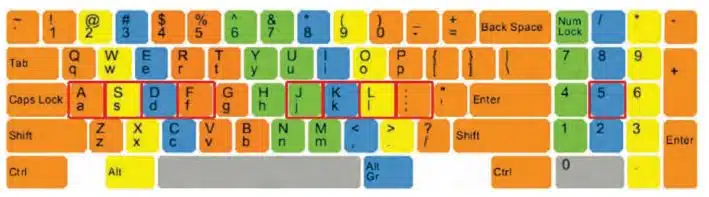
What do you mean by home keys?
Alphabets ASDF are home keys for the left hand and (semi-colon) LKJ for the right hand. The fingers are trained to make the correct movement to other keys and each finger returns immediately to its respective home.
Typing and deleting text
- For typing text in a document you should click on the letter.
- To typing numbers in a document you should use the number lock or the numbers on the second row of keys on the keyboard.
- To delete text in a document you should use the backspace key or delete key.
How to type capital letters?
To type capital letters, switch ON the Caps Lock by pressing the key before typing.
What is typing symbols in keyboard?
Typing symbols are characters that are not letters or numbers and are also known as special characters. The Shift key is used to access the top typing symbols that are one of the keys with two characters.
Space between the typing word?
To get space between typed words, press the space bar once and then type the next word.
Creating new lines and spaces between paragraphs
To add additional lines and spaces between paragraphs, press the Enter or return key. Verify that a new line appears when the cursor is blinking.
Guide for typing
The cursor keys serve as a guide for typing. They can be used to move the position of the cursor. The cursor is the small downward line that flickers in a sentence while typing.
Pointing devices
Some items, such as the ‘print’ or ‘close’ buttons, can be selected from the computer screen without a keyboard and this can only be done with a pointing device. Examples of point and draw devices are joystick, light pea, touch pad or track ball and touch screen.
Mouse pointer
Mouse is a pointing device used to point a particular place on the screen and select to perform one or more actions . Using mouse you can select menu commands, resize windows, selecting actions etc.
A mouse primarily comprises of three parts: the buttons, the handling area, and the rolling object.
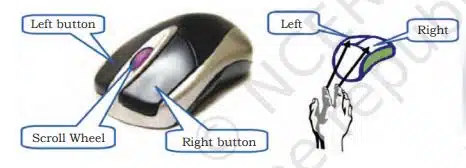
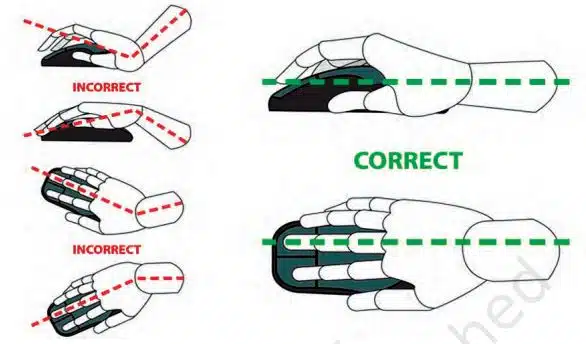
Correct and incorrect positioning of fingers on the mouse
Mouse operations
The common mouse actions are as follows:
- Click or left click
- Double click
- Right click
- Drag and drop
- Scroll
- Blocking
Typing ergonomics
Typing ergonomics provides the logistic support for efficient and effective typewriting. Some of these factors included are as given as below.
Sitting posture
While operating the computer keyboard, sit straight, slightly bending your neck forward. Check your comfort and sitting position of body.
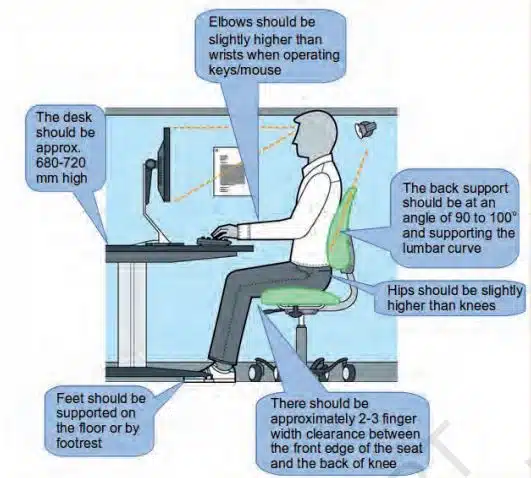
Position of hands
Put your forearms at level with the keyboard and palms down. Keep your wrists straight and hang your elbows naturally. Don’t touch the elbows to the body nor be too far away from the body. Bend at about a 90 degree angle.
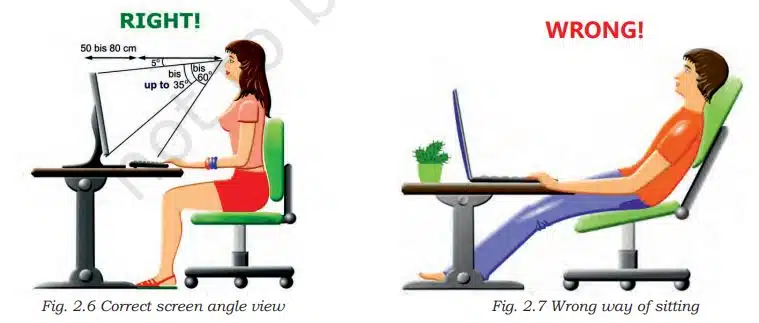
Monitor placement
Do not bend your neck while looking at the screen and keep the upper border of the screen at eye level. The distance of the screen from the user depends on the size of the screen. Keep an approximate distance of about 60–65 cm for a 17-inch screen.
Mouse and keyboard placement
Keep the keyboard and mouse together at an approximate distance of 20 cms.
Chair and table placement
The computer table should also have enough space for your legs. Proper ergonomics make typewriting a natural occurrence, preventing unnecessary strain.
Placement of matter to be typed
Place the matter for typing to the left or right side of the keyboard preferably on a Copy Holder which has a sloping surface.
Positioning of fingers on the keyboard
Your finger position on the keyboard should always be on the home key. The fingers are taught to move correctly to the other keys, so that after pressing a key, your finger instantly returns to its home key.
Allocation of keys to fingers
The keyboard learning process starts from the second row (Home Row) followed by the Third Row (Upper Row), First Row (Bottom Row) and the Fourth Row (Number Row).
Allocation of keys to fingers on the second row (home row)
Place four fingers of each hand on Home Keys. The remaining two keys ‘g’ and ‘h’ on the second row are operated by the forefingers (Index Finger) of left and right hand, respectively.
Allocation of keys to fingers on the third row (upper row)
The next step is learning the key-reaches from the Home Row to the row above it. The learning begins with the reaches from ‘a’ to ‘q’ by left hand little finger and from ‘;’ to ‘p’ by right hand little finger.
Allocation of keys to fingers on the first row (bottom row)
After learning how to operate keys on Home Row and Third Row, the next step is to learn how to operate keys on the First Row. Keys Z, X, C, V, B, N, M, Comma, Full Stop and ‘/’ sign are located on this row.
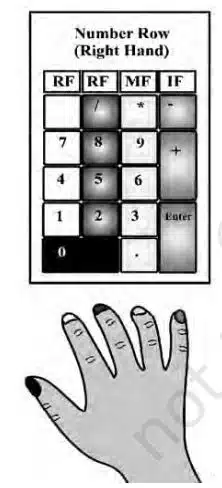
Using numeric keypad
Numeric keypad is important in numeric data entry. The numeric keypad has four columns and five rows. The row which has 4, 5, 6 and is called Home Row. This is the row which is initially practiced by a touch typist. On a numeric keypad, the number 5 is the guide key.
Successful keyboarding tips
The following points may be kept in mind for successful keyboarding techniques.
- Press the keys with feather touch.
- Rest your fingers on Home row while typing.
- Allow your fingers to fall naturally on the keys.
- While typing, release the key immediately as soon as you press it.
- Do not look at the keyboard while practicing.
- Press the keys with equal intervals.
- Press the keys only with the fingers allotted for them.
- Do not take any mental stress while typing.
- Secure typing ergonomics.
Introduction to Rapid Typing Tutor
Rapid Typing Tutor is a Free and Open Source Software (FOSS) designed to learn typing skills on the computer. Learning to type is fun with the typing game included with Rapid Typing Tutor.
Touch typing technique
Touch typing improves typing speed and accuracy. A touch typist never looks at the keyboard. The fingers hit the right keys by habit.
Touch typing can be learned by performing special exercises.
- Stage one of the process begins with learning the Home Row of the keyboard (the row beginning with the Caps Lock key). Looking at the keyboard is strictly forbidden.
- Stage two involves memorising frequently used syllables and typing words containing these syllables.
- Stage three involves typing actual text to perfect the skills acquired.
Color indicator of Rapid Typing Tutor
The colour indication is as follows:
- Green letters denote right inputs.
- Yellow letters stand for right inputs exceeding the acceptable timeframe.
- Red letters denote wrong inputs within the acceptable timeframe.
- Orange letters indicate wrong inputs that also exceed the acceptable timeframe (it’s the
worst result).
Calculating the typing speed
The typing speed can be measured with different accuracies, such as
| Types | Description | Formula |
|---|---|---|
| WPM | the number of words typed in a one minute period of time | WPM = ( Words without errors + Words with errors ) / Time spent in minutes |
| Net WPM | the WPM without words with errors | Net WPM = WPM – ( Words with errors / Time spent in minutes ) |
| CPM | the number of characters typed in a one minute period of time | CPM = ( Characters without errors + Characters with errors ) / Time spent in minutes |
| Net CPM | the CPM without characters with errors | Net CPM = CPM – ( Characters with errors / Time spent in minutes ) |
| KPM | the number of keystrokes in a one minute period of time | KPM=(Keystrokes without errors + Keystrokes with errors ) / Time spent in minutes |
| Net KPM | the KPM without keystrokes with errors | Net KPM = KPM – ( Keystrokes with errors / Time spent in minutes ) |
Employability skills Class 9 Notes
- Unit 1 – Communication Skills Class 9 Notes
- Unit 2 – Self-Management Skills Class 9 Notes
- Unit 3 – Basic ICT Skills Class 9 Notes
- Unit 4 – Entrepreneurial Skills Class 9 Notes
- Unit 5 – Green Skills Class 9 Notes
Employability skills Class 9 MCQ
- Unit 1 – Communication Skills Class 9 MCQ
- Unit 2 – Self-Management Skills Class 9 MCQ
- Unit 3 – Basic ICT Skills Class 9 MCQ
- Unit 4 – Entrepreneurial Skillls Class 9 MCQ
- Unit 5 – Green Skills Class 9 MCQ
Employability skills Class 9 Questions and Answers
- Unit 1 – Communication Skills Class 9 Questionns and Answers
- Unit 2 – Self-Management Skills Class 9 Questions and Answers
- Unit 3 – Basic ICT Skills Class 9 Questions and Answers
- Unit 4 – Entrepreneurial Skills Class 9 Questions and Answers
- Unit 5 – Green Skills Class 9 Questions and Answers
Information Technology Class 9 Notes
- Unit 1 – Introduction to IT-ITeS Industry Class 9 Notes
- Unit 2 – Data Entry and Keyboarding Skills Class 9 Notes
- Unit 3 – Digital Documentation Class 9 Notes
- Unit 4 – Electronic Spreadsheet Class 9 Notes
- Unit 5 – Digital Presentation Class 9 Notes
Information Technology Class 9 MCQ
- Unit 1 – Introduction to IT-ITeS Industry Class 9 MCQ
- Unit 2 – Data Entry and Keyboarding Skills Class 9 MCQ
- Unit 3 – Digital Documentation Class 9 MCQ
- Unit 4 – Electronic Spreadsheet Class 9 MCQ
- Unit 5 – Digital Presentation Class 9 MCQ
Information Technology Class 9 Questions and Answers
- Unit 1 – Introduction to IT-ITeS Industry Class 9 Questions and Answers
- Unit 2 – Data Entry and Keyboarding Skills Class 9 Questions and Answers
- Unit 3 – Digital Documentation Class 9 Questions and Answers
- Unit 4 – Electronic Spreadsheet Class 9 Questions and Answers
- Unit 5 – Digital Presentation Class 9 Questions and Answers
Disclaimer: We have taken an effort to provide you with the accurate handout of “Data Entry and Keyboarding Skills Class 9 Notes“. If you feel that there is any error or mistake, please contact me at anuraganand2017@gmail.com. The above CBSE study material present on our websites is for education purpose, not our copyrights. All the above content and Screenshot are taken from Information Technology Class 9 CBSE Textbook and Support Material which is present in CBSEACADEMIC website, This Textbook and Support Material are legally copyright by Central Board of Secondary Education. We are only providing a medium and helping the students to improve the performances in the examination.
For more information, refer to the official CBSE textbooks available at cbseacademic.nic.in
I think so this notes were best before examination, after so much difficulties I get this one and I really thank the autherfor this.
Nice note helped in my exam presentation
Amazing notes, keep up the good work !… It helped me a lot in my preparations for exams . Thanks a lot dear author ☺️✌️
i love it !!!! chumeshwari
hi
Superb notes ????these notes help me alots???? I do all my IT NOTES FROM HERE . THANK U
Superb notes ????these notes help me alots???? I do all my IT NOTES FROM HERE . THE PERSON WHO MAKE THESE NOTES AND WEBSITE. I WANT TO SAY 1 THING TO HIM OR HER YOU ARE MY SUPER HERO I LOVE YOU JUST MAKE NOTES LIKE THAT ………….. THANK ALOT ????????????????????????????…..!!!!!!
I am very giving wish to grow up you work
Nice notes, it helped me a lot.
Thank u soo much