Teachers and Examiners (CBSESkillEduction) collaborated to create the Electronic Spreadsheet Class 9 Notes. All the important Information are taken from the CBSE Textbook Information Technology Class 9 Based on CBSE Board Pattern.

Electronic Spreadsheet Class 9 Notes
What is spreadsheet application?
Spreadsheet application is tool which is used to perform all kinds of calculations easily and accurately. A spreadsheet software can store, manipulate, analyse the data and create graphical representations of data easly.
Calc is used to perform the following activities accurately and efficiently.
- Tabulation of data
- Simple mathematical calculations
- Complex calculations using formula and functions
- Arranging data in ascending and descending order (sorting)
- Check the validity of data
- Protection of data using passwords
Getting Started with Libreoffice Calc
There are various types of spreadsheet applications developed by various software corporation.
- Microsoft Excel
- Google Sheets (work on google workplace)
- OpenOffice Calc
- LibreOffice Calc
Starting LibreOffice Calc
(a) To start the LibreOffice Calc
- In Windows, find the shortcut of LibreOffice on Start menu or on the desktop. Double click the shortcut to open LibreOffice.
- In Ubuntu Linux, find the Calc icon on application launcher or search it by clicking on “Show Applications”
Parts of LibreOffice Calc
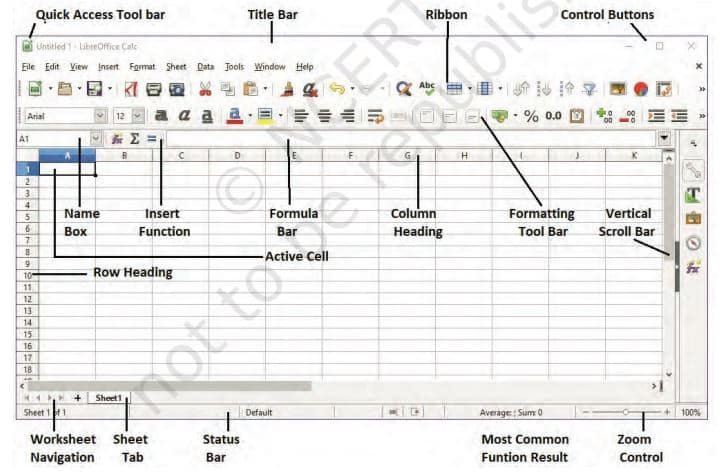
A brief overview of the LibreOffice spreadsheet’s parts.

- Title bar: The Title bar, located at the top, shows the name of the current spreadsheet.
- Menu bar: Menu bar is located just below the Title bar. It contains the menus with commands for various tasks.
- Toolbars: The Calc opens with the Standard and Formatting toolbars at the top of the workspace by default.
- Name box: shows the cell reference, for example A1.
- Functions wizard: search the function from the list of available functions.
- Sum: used to total the numbers in the cells above the selected cell.
- Function: clicking on the Function icon inserts an equals (=) sign into the selected cell and the Input line allow formula to be entered.
- Input line: displays the contents of the selected cell (data, formula, or function) and allows editing the cell contents.
- Worksheet: The worksheet in Calc is also referred to as spreadsheet. The spreadsheet can have many sheets.
- Rows and columns: The sheet is divided into vertical columns and horizontal rows. Each sheet can have a maximum of 1,048,576 (220) rows and 1024 (210) columns. The rows are numbered as 1,2,3,4,… and columns are numbered as A, B, C, D.
- Cell and cell address: The intersection of a row and column is called a cell. A cell address is denoted by its column (letter) and row number. For example, D4, E9, Z89.
- Range of cells: When we select multiple cells refers to the cell range in the worksheet. The cell range can be selected column-wise, row-wise or both. Each cell range also has its own unique address.
- Active cell: In a spreadsheet, cell is the place where we enter the data or this selected or activated cell is called as active cell. Active cell in a worksheet can be moved and selected by the key or a combination of keys.
| Key or Key Combination | Result of Key or Combination |
|---|---|
| Arrow keys (←↑→↓) | Move a single cell in arrow direction |
| Ctrl + Arrow Keys | Moves the cell to the end of the data range in a particular direction |
| Home | Moves to column A along the row where the active cell is |
| Ctrl + Home | Moves the cell to A1 position |
| Ctrl + End | Moves to bottom right cell of the data range |
| Page Up | Moves the worksheet one screen up |
| Page Down | Moves the worksheet one screen down |
Entering data
To enter any data in a worksheet, practically in the cell, it is required to select the cell. The data to be entered can be the label, values or formula.
- Label: Label is the any text entered by using a keyboard. It may combine with letters, numbers, and special symbols.
- Values: The numerical data consisting of only numbers are called values. By default values are right aligned.
- Formulae: Any expressions that begins with an equals ‘=’ is treated as formula.
Note: The values do not display the preceding zero. To show the preceding ‘0’, the data type has to be specified as ‘Text’.
Mathematical operators used in formulae
Calc can add, subtract, divide, multiply and much more. LibreOffice Calc uses standard operators for formulae, such as a –
| plus(+) | minus(-) | multiplication (*) | division (/) |
Follow the mathematical BODMAS rules when using multiple operators.
- Brackets ( )
- Order ^
- Division /
- Multiplication *
- Addition +
- Subtraction –
Note: The order of evaluation can be changed by using brackets. (The expressions within the brackets are evaluated first).
Formulae with cell addresses and operators
The main advantage of entering formula with cell addresses and operators, works just like a variable. When the values of the cells concerned change, the results obtained by the formula also get updated accordingly.
Basic functions in Calc
The spreadsheet applications contain different functions to meet the requirements of different fields. The basic commonly used functions are given in the Table:
| Function | Syntax | Use |
|---|---|---|
| SUM | =SUM(N1,N2,….) | Adds the values contained in a range of cells. |
| AVERAGE | =AVERAGE(N1,N2,….) | Finds out the average of the values contained in a range of cell |
| MAX | =MAX(N1,N2,……) | Finds out the largest value contained in a range of cells. |
| MIN | =MIN(N1,N2,……) | Finds out the smallest value contained in a range of cells. |
| COUNT | =COUNT(N1,N2,…..) | Counts the number of cells within a range of cells. |
Formatting the worksheet
The cell holds any type of data in the spreadsheet. The cell data can be formatted using formatting toolbar or cell formatting window. The Format cells dialog box can be opened using Format→cells from the menu bar, or from context menu opened through right clicking the cell.
| Tool | Details |
|---|---|
| Font | Apply different font types on a worksheet |
| Font Size | Apply different font sizes on a worksheet |
| Bold | Make the selected text bold |
| Italic | Italicize the selected text |
| Underline | Underline the selected text |
| Left Alignment | Align text in a cell to the left |
| Center Alignment | Align text in a cell to the center |
| Right Alignment | Align text in a cell to the right |
| Increase decimal places | Show more precise value by showing more decimal places |
| Decreased decimal places | Show less precise decimal places |
Speeding up data entry
Calc includes several other tools for automating input, especially of a repetitive task. They include the fill tool, selection lists, and the ability to input information into multiple sheets of the same document.
Using the fill handle
The Calc Fill Handle tool is used to fill the next cells till you drag it with the next predefined value. For example, if you want to fill the numbers in sequence of 1,2,3…., or days of the week as Monday, Tuesday, …., or month name as Jan, Feb,…., enter the first two values, select them and drag to the next cells.
- For number series: Type the numbers 1, 2 in two consecutive cells and select them using a mouse and drag the cell using fill handle.
- Copying a formula: If you wish to apply the same formula to the multiple cells in the rows or columns then you have to drag the cell using fill handle.
Referencing
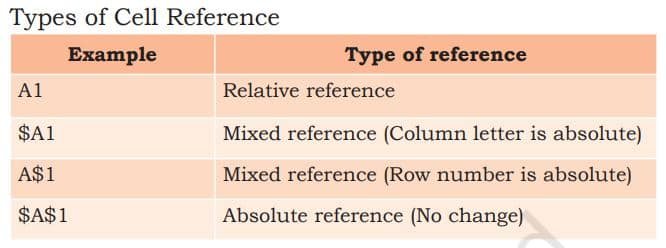
Referencing is the way to refer the formula or function from one cell to the next cell along the row or column. There are three types of referencing.
- Relative referencing
- Absolute referencing
- Mixed referencing
Relative referencing
When you drag any formula in any row or column in any direction, the formula gets copied in the new cell with the relative reference.
Absolute referencing
In Absolute referencing, a $ symbol is used before the column name and row number to make it constant in any formula. The reference remains constant even when the formula is copied or movieed to another cell.
Mixed reference
In Mixed Referencing, the $ sign is used before row number or column name to make it constant. The mixed cell reference combines an absolute reference and a relative reference. The use of mixed cell references is advantageous for copying formulas and functions.
Thumb rule for referencing

Creation of Charts Using Spreadsheets
It is not easy to comprehend, compare, analyse or present data when they are represented as numbers. But when data are presented in the form of charts they become an effective tool to communicate.
| Types | Purpose |
|---|---|
| Column Chart | Comparing classes of data items in group. Group comparison |
| Bar Chart | Comparing classes of data items in group. Group comparison |
| Line Chart | Comparing classes of data items in group. Group comparison |
| Pie Chart | Comparing classes of data items as percentage. |
| XY Scatter Chart | Comparing data in pairs |
Let us use the worksheet below to create a column chart
- Follow the steps given below to create charts.
- Select the range of data (A1:F7)
- Insert → Chart
- Select the type of chart
Employability skills Class 9 Notes
- Unit 1 – Communication Skills Class 9 Notes
- Unit 2 – Self-Management Skills Class 9 Notes
- Unit 3 – Basic ICT Skills Class 9 Notes
- Unit 4 – Entrepreneurial Skills Class 9 Notes
- Unit 5 – Green Skills Class 9 Notes
Employability skills Class 9 MCQ
- Unit 1 – Communication Skills Class 9 MCQ
- Unit 2 – Self-Management Skills Class 9 MCQ
- Unit 3 – Basic ICT Skills Class 9 MCQ
- Unit 4 – Entrepreneurial Skillls Class 9 MCQ
- Unit 5 – Green Skills Class 9 MCQ
Employability skills Class 9 Questions and Answers
- Unit 1 – Communication Skills Class 9 Questionns and Answers
- Unit 2 – Self-Management Skills Class 9 Questions and Answers
- Unit 3 – Basic ICT Skills Class 9 Questions and Answers
- Unit 4 – Entrepreneurial Skills Class 9 Questions and Answers
- Unit 5 – Green Skills Class 9 Questions and Answers
Information Technology Class 9 Notes
- Unit 1 – Introduction to IT-ITeS Industry Class 9 Notes
- Unit 2 – Data Entry and Keyboarding Skills Class 9 Notes
- Unit 3 – Digital Documentation Class 9 Notes
- Unit 4 – Electronic Spreadsheet Class 9 Notes
- Unit 5 – Digital Presentation Class 9 Notes
Information Technology Class 9 MCQ
- Unit 1 – Introduction to IT-ITeS Industry Class 9 MCQ
- Unit 2 – Data Entry and Keyboarding Skills Class 9 MCQ
- Unit 3 – Digital Documentation Class 9 MCQ
- Unit 4 – Electronic Spreadsheet Class 9 MCQ
- Unit 5 – Digital Presentation Class 9 MCQ
Information Technology Class 9 Questions and Answers
- Unit 1 – Introduction to IT-ITeS Industry Class 9 Questions and Answers
- Unit 2 – Data Entry and Keyboarding Skills Class 9 Questions and Answers
- Unit 3 – Digital Documentation Class 9 Questions and Answers
- Unit 4 – Electronic Spreadsheet Class 9 Questions and Answers
- Unit 5 – Digital Presentation Class 9 Questions and Answers
Disclaimer: We have taken an effort to provide you with the accurate handout of “Electronic Spreadsheet Class 9 Notes“. If you feel that there is any error or mistake, please contact me at anuraganand2017@gmail.com. The above CBSE study material present on our websites is for education purpose, not our copyrights. All the above content and Screenshot are taken from Information Technology Class 9 CBSE Textbook and Support Material which is present in CBSEACADEMIC website, This Textbook and Support Material are legally copyright by Central Board of Secondary Education. We are only providing a medium and helping the students to improve the performances in the examination.
For more information, refer to the official CBSE textbooks available at cbseacademic.nic.in
