
Manicure Pedicure and Mehendi Class 9 Notes provide complete and easy-to-understand study material for students learning Beauty and Wellness skills. This chapter explains the importance of nail care, hand and foot care, different steps of manicure and pedicure procedures, tools and products used, hygiene practices, and safety measures.
Manicure Pedicure and Mehendi Class 9 Notes
The two main services in beauty parlours are manicure (hands and nails) and pedicure (feet and nails). Both help improve appearance, soften skin, and relax muscles. To do them well, an Assistant Beauty Therapist must know some anatomy.
Session 1: Anatomy of the Nail, Hand and Feet
What is anatomy?
Anatomy is the study of body structure, like an assistant beauty therapist. The beauty therapists need this knowledge because they work directly on hands, feet, arms and legs during treatments like massage, manicure and pedicure.
Human body systems are
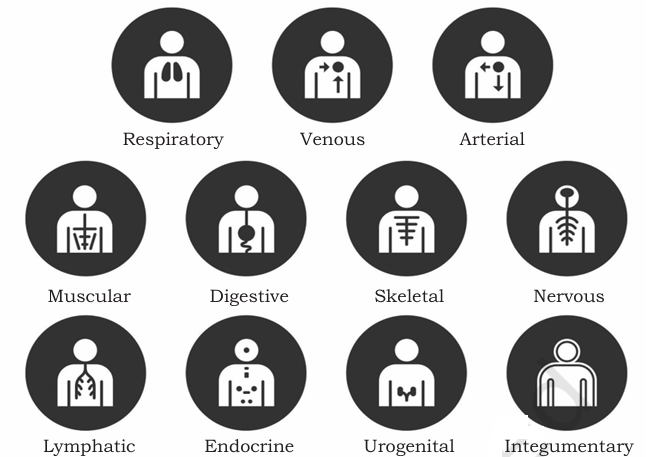
Why Does Anatomy Matter for Beauty Therapy?
It helps the muscles relax through massage. It prevents harm by spotting disease, infection or contraindication (this is a condition when treatment should not be done).
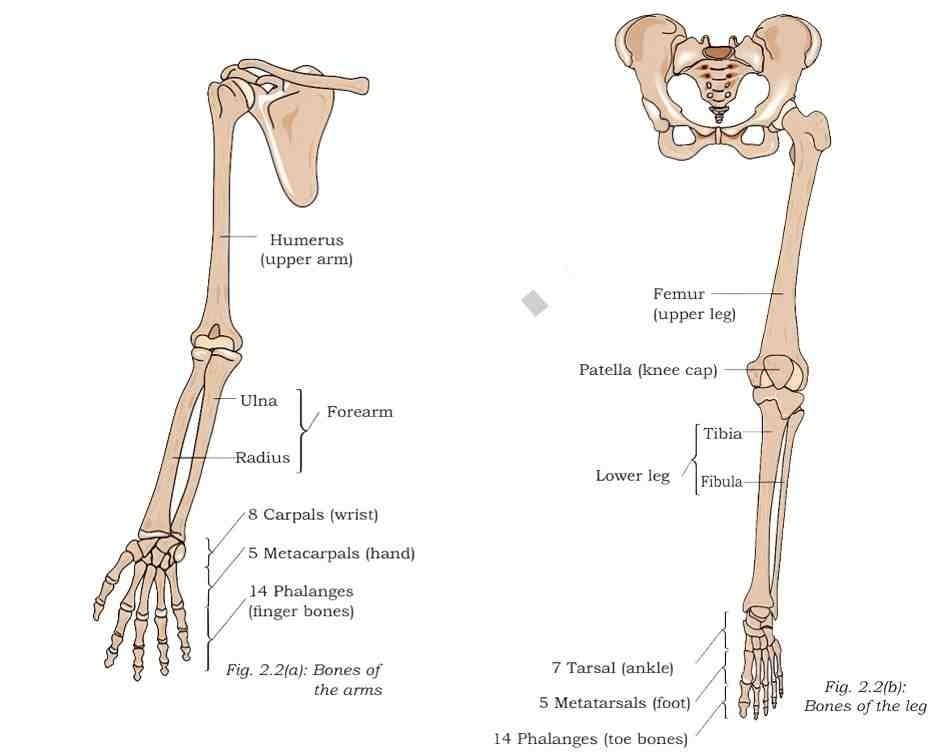
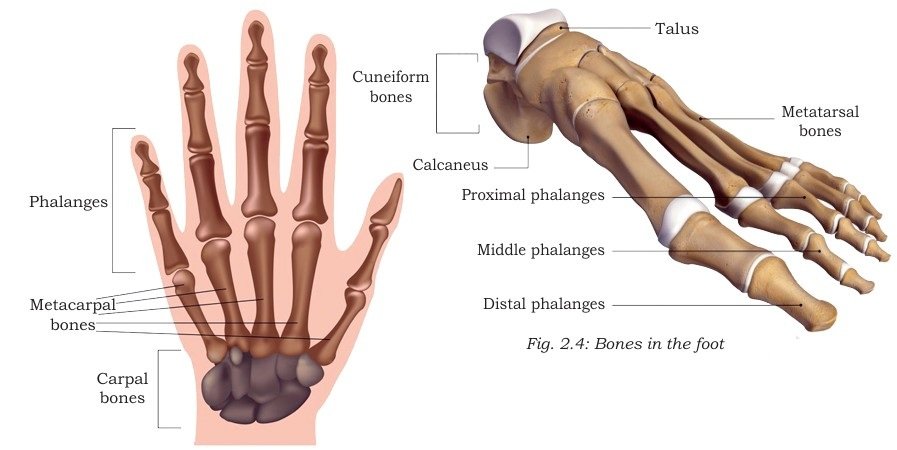
Skeletal system
The skeletal system protects internal organs and works with muscles for movement. For example,
- Ribcage: protects heart & lungs
- Skull: protects brain
- Vertebral column: protects spine
- Parts of Skeletal System
- Bones: framework of body
- Bone marrow: makes blood cells
- Joints: where bones meet, helping movement
- Cartilage: soft tissue in joints that cushions bones
- Tendon: connects muscle to bone
- Ligament: connects bone to bone
Massage Benefits for Skeletal System
Massage helps by:
- improves posture
- improves muscle tone
- reduces joint stiffness and pain
- increases flexibility of muscles
- increases range of motions
- reduces inflammation
- improves soreness and fatigue
- reduces the number and intensity of muscle spasms
- facilitates body alignment
- facilitates mineral retention
- relaxes tight muscles and tendons
Muscular system
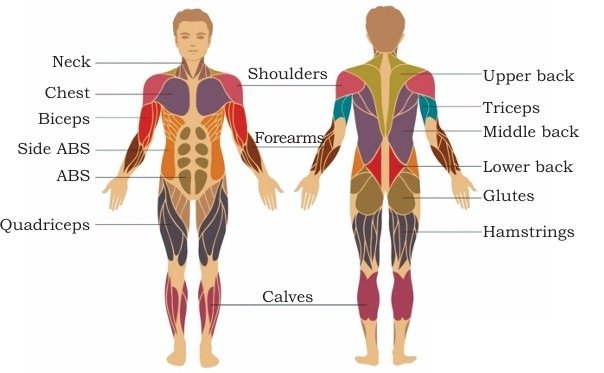
The body has more than 650 muscles. They give strength, movement, balance, posture, stability and muscle tone. These muscles also help in heat production, meaning keeping the body warm. Massage assists the muscular system in the following ways:
- reduces connective tissue thickening
- helps in toning up the muscles
- decreases fibrous adhesions from muscle tissue injury or immobilisation
- enhances cell activity
- enhances posture and balance
- enhances range of motions
- facilitates movement
- facilitates waste removal in the lymph system
- increases flexibility
- reduces pain
- helps in post-operative rehabilitation, a period of recovery after surgery
- provides relaxation
- releases facial constrictions
- stimulates the circulatory system
- stimulates the nervous system’s sensory neurones
- Warms up or warms down muscles during an exercise
Structure of the nail
Nails are made of keratin; this is one type of protein. Nails help to protect finger/toe tips and help grasp small objects.
- Healthy nails: smooth, shiny, pink.
- Unhealthy nails: show disorders or poor growth (can indicate health problems).
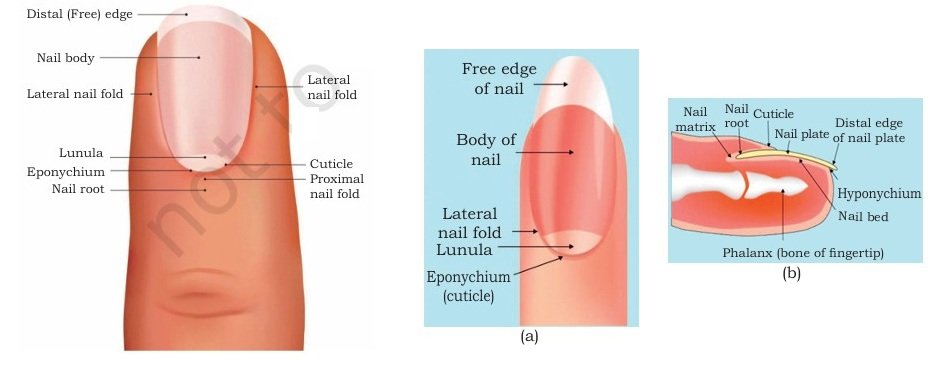
The fingernails grow about 1/8 inch per month. The toenails grow slower. The full nail growth takes 4 to 6 months, and this growth of the nail is faster in summer than in winter. The fastest-growing nail is the middle fingernail, and the slowest-growing is the thumbnail. There are six parts of a nail –
- Root: where nail starts growing
- Nail bed: skin under nail
- Nail plate: hard, visible part
- Eponychium (cuticle): protective skin at base
- Perionychium: skin around the sides of the nail
- Hyponychium: skin under free edge
Session 2: Manicure
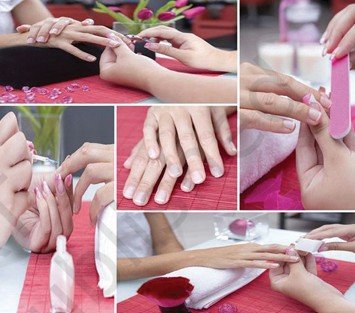
A manicure is a treatment for the hands and fingernails, while a pedicure is for the feet, toenails, and legs. Both are popular salon services because they make the skin smooth and the nails neat, shiny, and well-shaped. Regular treatment prevents small nail damages, encourages nail growth, and keeps the cuticles pushed back. It also protects the surrounding skin from minor problems.
Benefits of Manicure
- Nails look clean, polished, and attractive.
- Hands feel soft and smooth.
- Cuticles stay healthy and neat.
- Minor nail or skin issues can be prevented.
Preparing the Work Area
Before starting a manicure or pedicure, the therapist must prepare the space properly. A clean and organised workspace helps the client stay safe. All the tools, equipment and products should be within reach.
Hygiene Rules
- Clean trolleys, work surface(s) and shelves with surgical spirit.
- Clean and disinfect the work surface(s) prior to use.
- Use clean warm towels and a bedroll for each client.
- Use disposable products.
- Use a spatula to take out products from containers.
- Clean the neck of a nail enamel bottle before putting the lid on.
- Maintain a clean and tidy work area.
- The therapist must wash her/his hands with soap/hand wash before and after each treatment.
- Sterilise all tools before and after use or dispose them of, depending on their type.
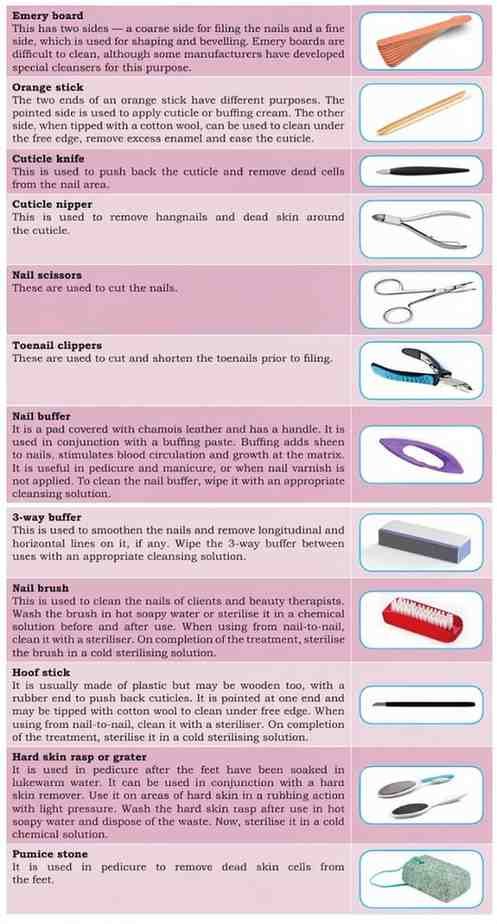
Equipment and materials used in manicures and pedicures
Contraindications
A contraindication is a condition that makes a treatment unsafe or requires modification.
Contraindications that prevent treatment (cannot treat)
- Haemophilia: blood doesn’t clot normally.
- Arthritis: swollen joints.
- Bruised nail: injury causing discolouration.
- Psoriasis of the nail: deep pitting of the nail bed.
- Onycholysis: nail separates from bed.
- Tinea unguium: fungal infection, yellow/white patches.
Contraindications that restrict treatment (workaround)
- Onychorrhexis: brittle, splitting nails.
- Leukonychia: white spots from injury.
- Furrows: ridges from age/trauma.
- Beau’s lines: horizontal ridges from illness.
- Onychophagy: nail biting and sore skin.
- Nail separation: part of nail lifts off bed.
- Ingrowing nails: nails grow into flesh and may infect.
- Split & brittle nails: from detergents, injury, and arthritis.
- Paronychia: painful, red, swollen nail fold (infection).
Manicure steps
Step 1 – Consultation: Talk with the client about their needs. Decide nail length, shape, and polish type. Check for any contra-indications before starting.
Step 2 – Choose Style: Let the client pick the manicure style (dark, plain, frosted, or French). Suggest what suits their nails best.
Step 3 – Remove Old Polish: Take off old nail paint. Check nails for ridges or problems. Sanitize hands to avoid infection.
Step 4 – Cut Nails: Trim nails to the client’s preferred shape using sterilized scissors. Dispose of clippings properly.
Step 5 – File Nails: Smooth and shape nails with an emery board.
Step 6 – Bevel Nails: Seal the free edge to prevent damage and water loss.
Step 7–8 – Apply Cuticle Cream: Use an orange stick to apply cream around cuticles. Massage gently to soften skin.
Step 9–10 – Soak Hands: Check water temperature. Soak hands to soften cuticles further. Dry with a clean towel.
Step 11–12 – Remove Cuticles: Use cuticle remover carefully. Trim excess cuticle with a knife or nippers. Bevel again for smooth edges.
Step 13–17 – Massage: Massage hands and arms with cream or oil:
- Light strokes up to the elbow.
- Circular thumb friction on forearm.
- Gentle circles on the back of the hand.
- Small circular movements on each finger.
- Stretch fingers by pulling and twisting gently.
Applying nail polish
- Base Coat: Start with a base coat. Apply from the cuticle towards the tip, moving left to right. This protects the nail and helps polish last longer.
- Choose Colour: Pick a nail polish colour that matches the client’s preference. Dark shades make nails look shorter, so they’re not ideal for short or bitten nails.
- Prep the Brush: Dip the brush in polish, then wipe off extra paint on the rim of the bottle. This ensures an even, smooth coat without excess polish.
- First Coat: Apply polish starting at the cuticle, pressing the brush so it fans out. Move towards the tip in one smooth stroke, left to right, for an even layer.
- Seal the Tips: After the first coat, drag the brush gently along the nail tip edge. This seals the polish and makes the manicure last longer.
- Top Coat: Finish with a top coat, applied the same way as the base coat. It adds shine and protects the colour.
Nail shapes
Everyone’s nails are different, but these are the most popular shapes:
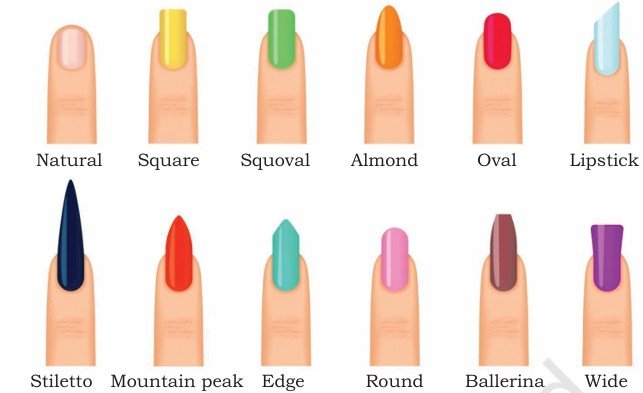
- Oval: soft curves, adds length, suits most hands.
- Square: straight sides, sharp tips, neat look, best for long nail beds.
- Squoval: mix of square + oval, softer edges, suits all nail types.
- Round: curved edges, simple, makes wide hands look slender.
- Pointed: sharp tip, creates length, stylish but less common.
Session 3: Pedicure
A pedicure is a beauty treatment for the feet and toenails. It improves appearance, prevents nail diseases, and provides relaxation. Modern pedicures also include leg care below the knee (hair removal, exfoliation, moisturising, and massage).
- Improve the appearance of feet and nails.
- Relax tired feet.
- Remove hard skin from soles
Provide therapeutic benefits
A pedicure includes
- Shaping the nails
- Cuticle treatment
- Removal of hard skin
- Specialised foot treatment
- Foot and leg massage
- Nail varnish application as required by a client
Most of the steps followed in a manicure apply to a pedicure too. The major differences between the two are the following:
- positioning of a client
- treatment of hard skin
- foot and leg massage
Contraindications for pedicures
A contraindication is a condition that either prevents a treatment or may restrict one. For example, a bruised nail may restrict treatment, while a bacterial or fungal infection will prevent the treatment completely due to the risk of cross-infection.
Contra-indications that prevent treatment
- Multiple warts
- Fungal infection(s)
- Bacterial infection(s)
Contra-indications that restrict treatment
- Bruised nail
- Cut an aberration on hand or fingers
Pedicure Procedure (Step-by-Step)
Wash hands and check the client for contraindications.
- Soak feet in antiseptic solution.
- Dry feet with a clean towel.
- Remove old polish and examine nails.
- Cut nails straight across to avoid ingrown nails.
- File nails with an emery board.
- Apply cuticle cream and massage.
- Exfoliate hard skin with pumice stone or scrub.
- Dry feet thoroughly (especially between toes).
- Remove cuticles gently with cuticle remover.
Pedicure Massage Movements
Pedicure massage uses kneading, tapping, effleurage, and thumb frictions to relax the feet and legs.
- Effleurage: smooth circular strokes from ankle to knee (front, sides, back).
- Kneading: circular finger kneading around the knee, palm kneading on the calf, and thumb kneading from ankle to knee.
- Ankle massage: circular finger kneading around the ankle, knead the Achilles tendon.
- Foot massage: thumb frictions from toe to ankle, palm kneading on top and sole, friction circles on each toe.
- Sole massage: thumb frictions (sawing action) from toe to heel, palm kneading six times.
- Final effleurage: smooth strokes from foot to knee, with firm pressure to avoid a ticklish sensation.
Benefits
- Relieves stiffness and pain in muscles.
- Improves blood circulation in feet and legs.
- Reduces tension in toes, ankles, and calves.
- Provides relaxation and comfort after a pedicure.
Pedicure Aftercare Tips
- Moisturise daily: Apply lotion to feet after bathing to keep skin soft.
- Dry feet properly: especially between toes, to avoid infections.
- Use foot powder: Talc or special powder helps absorb moisture.
- Keep feet fresh: Use creams, sprays, or oils (peppermint/citrus are the best).
- Massage cuticles: Apply cuticle cream or oil regularly.
- Avoid acetone removers: Use non-acetone polish remover to protect nails.
- Moisturise nails: Apply cream after removing polish since removers can dry nails.
Session 4: Henna or Mehendi
Henna is a plant, whose leaves are ground and made into a fine powder or paste to dye the skin and hair. It leaves a maroon-red colour on the skin and has a cooling effect. The paste made out of dried henna leaves is called ‘mehendi’.
Cultural Importance
- Mehendi is deeply connected to traditions and weddings.
- It is often applied during festivals, celebrations, and ceremonies.
- The palm usually gets the darkest stain, while arms, feet, and legs show lighter shades.
- The best colour develops in 1–2 days after application.
Other Uses
- Henna is also used as a hair dye because of its natural conditioning properties.
- Both men and women use it to strengthen and colour hair.
Mehendi Application Safety Tips
- Patch test: Always test with a small dot on the client’s hand first. This ensures they don’t have an allergic reaction.
- Check expiry date: Expired mehendi can cause itching or burning.
- Avoid after waxing: Never apply mehendi immediately after waxing because open pores can react to chemicals. Wait 1–2 days.
- Use body art henna: Make sure it’s safe for skin, not hair henna.
- Sieve powder: Filter the mehendi powder before making paste to remove impurities.
Why This Matters
- Prevents skin irritation or allergic reactions.
- Ensures safe and smooth application.
- Gives a better colour result on the skin.
Tools and material required
- Henna cone
- A book of mehendi designs
- A transparent glass sheet (an alternate to it can be a plastic sheet)
- Tissue paper
- Glitter cone (optional)
- Pencil
Preparation
Mehendi application includes two important steps that must be followed by an artist. These are — mehendi mixture preparation and cone formation.
Mehendi mixture preparation
Materials Needed
- Henna powder: Use body art quality henna (safe for skin). Avoid hair henna, which contains metallic salts and chemicals.
- Lemon juice: Helps the colour penetrate deeper, making the stain darker.
- Sugar (optional): Keeps mehendi paste sticky and wet for longer, resulting in a deeper maroon-red shade. Avoid in humid areas.
- Essential oils (lavender, tea tree, eucalyptus): Release dye molecules and add fragrance. Use small amounts (about 30 ml oil per 100 g henna).
Method
- Take a glass bowl and put henna powder and sugar in it.
- Mix lemon juice and essential oils until you reach a thick consistency as of mashed potatoes.
- Cover the bowl with a plastic sheet and press it down to touch the top of the henna.
- Set it aside. The time varies for different types of henna. So, check for it every 4–6 hours. Put a dot on your hand and wipe it after 5 minutes. If an orange stain is formed, it is good to go.
- Now, mix more lemon juice to reach a slightly thinner consistency as of stirred yogurt.
- Put the paste in a cone and close its mouth with a rubber band.
Procedure
- Practice first: Try on glass/plastic sheet before applying on skin.
- Use designs: Take help from printed patterns or art books.
- Cut cone tip: Adjust size according to design.
- Test flow: Squeeze on tissue to check smoothness.
- Start simple: Begin with lines, dots, curves, circles.
- Create designs: Once confident, make flowers, leaves, hearts.
- Keep cone clean: Wipe tip often for neat work.
- Apply carefully: Start from far end, move closer.
- Avoid mistakes: Easy to fix on sheet, but hard on skin (colour lasts 10–15 days).
Sparkle Mehendi
- Sparkle mehendi blends glitter tattoos with traditional mehendi.
- Available in many colours and designs to match outfits.
- Made waterproof with adhesive glue paste, so it lasts even in hot baths.
- Gives instant colour + sparkle on the skin.
Wooden Block Mehendi
- Wooden block mehendi uses carved wooden blocks with designs.
- Ink is applied on the block and pressed firmly on the skin.
- Comes in many motifs → flowers, paisley, animals, finger blocks, etc.
- Quick and easy way to create decorative patterns.
After care advice
Give tips to clients to ensure that the design lasts longer.
- Apply the mixture of lemon juice and sugar on semi-dried mehendi. It will help the mehendi stay longer and leave a darker colour on the skin.
- Let the mehendi dry for at least three hours to achieve a darker colour.
- Do not use water to remove the mehendi. Avoid washing hands for at least 10 hours.
- Heat whole cloves or its powder on a pan and expose the hands to its smoke to achieve a darker shade.
Disclaimer: We have taken an effort to provide you with the accurate handout of “Manicure Pedicure and Mehendi Class 9 Notes“. If you feel that there is any error or mistake, please contact me at anuraganand2017@gmail.com. The above CBSE study material present on our websites is for education purpose, not our copyrights. All the above content and Screenshot are taken from Beauty and Wellness Class 9 CBSE Textbook and Support Material which is present in CBSEACADEMIC website, This Textbook and Support Material are legally copyright by Central Board of Secondary Education. We are only providing a medium and helping the students to improve the performances in the examination.
For more information, refer to the official CBSE textbooks available at cbseacademic.nic.in