In the digital age, graphic design is a powerful tool for communication and creativity. This chapter introduces students to two popular platforms Canva and Adobe Express used for creating stunning visuals with ease.
Graphic Designing Using Canva and Adobe Express Class 12 Notes
Introduction to Canva
Canva is used for designing graphics using thousands of free templates, photos, fonts and more. Canva was founded in Perth, Australia, on 1st January 2013 by Melanie Perkins, Cliff Obrecht and Cameron Adams.In December 2019, Canva announced Canva for Education means free for schools and educational institutions. On December 7, 2022, Canva launched Magic Write. On March 22, 2023, Canva announced its new assistant tool, which can make recommendations on graphics and style. n. On January 11, 2024, Canva launched its own GPT in OpenAI’s GPT Store.
Advantages of Canva
- Easy to Use: The drag-and-drop interface and ready-made templates make it easy to use.
- Cost-Effective: Canva is cost-effective because many features are given in the free version, which you do not require in the paid version.
- Versatile: Canva supports a wide range of designs for different platforms like social media, posters, flyers, presentations, infographics and more.
- Collaboration-Friendly: In Canva, multiple people can work on the same design in real time.
- Auto-save & Cloud Access: All the work can be saved automatically, and users can access and edit their designs from any device.
Tips for Using Canva Effectively
- Choose the Right Template: Canva provides a wide range of templates for different types of designs.
- Customise Design Elements: While Canva provides a range of design elements like fonts, colours, and images that can help to create a more personalized and professional-looking design.
- Keep it Simple: Avoid using too many colours or fonts, as this can make the design look cluttered and confusing.
- Use High-Quality Images: Using high-quality images is important for creating professional-looking designs.
How to Start Working in Canva
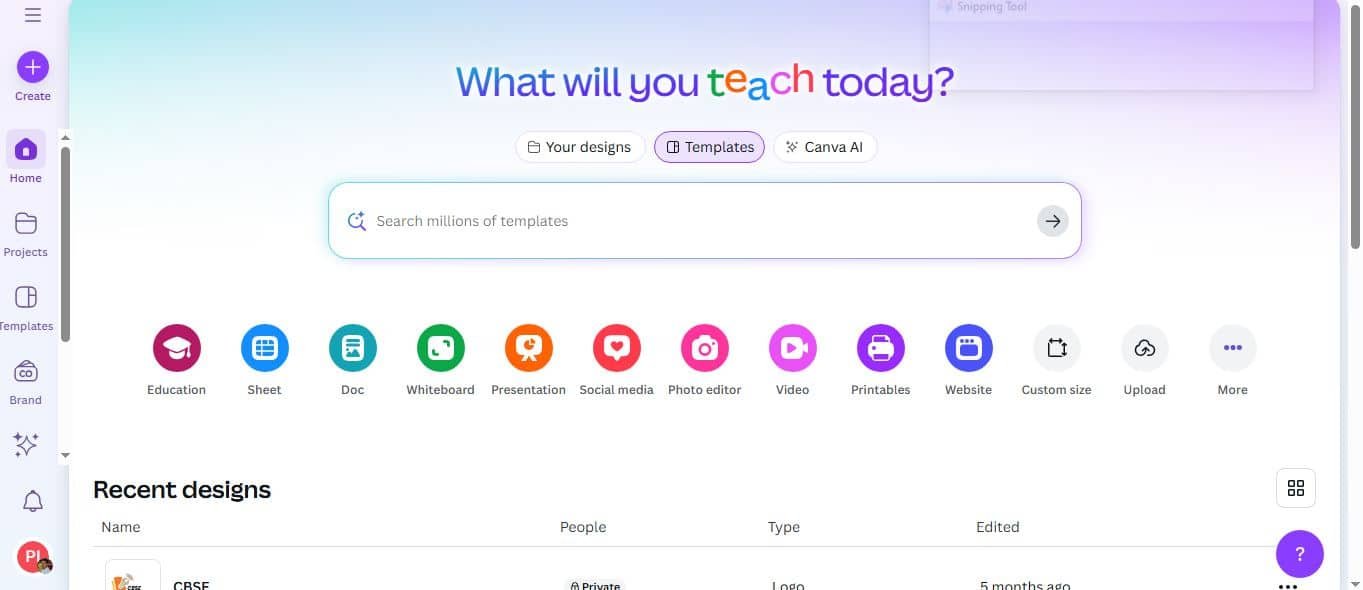
Canva does not require any installations on your PC; you can simply access it from www.canva.com and use it in your browser.

You can start your design using a template, or you can start from a blank version.

Creating a Poster using a Template
For creating a design using a Template, we have to click the Template option on the Home screen. We will look at the steps for creating a Poster, but the steps can be applied to any other design.
Creating and Editing a Video in Canva
For creating and editing a video in Canva, we can follow the steps (you are free to explore other ways of doing this):
- Step 1: Start with a blank video
- Step 2: Select a Template for your video by typing the topic in the search box, for example we search “AI for Education”. Or upload a video file in Uploads and place it on the timeline.
- Step 3: Make changes to the video to customize it according to your requirement, by doing any of the following:
- Adding a video, audio or image from the Uploads or Elements
- Resizing, flipping or rotating text or picture.
- Adding text to the video
- Animating the picture and video
- Using transitions
- Splitting or trimming the video
Splitting, Cutting, Trimming and Adding Transitions in a Video
- Splitting: Making two clips from one video clip by using Split Page (a video clip is called a ‘page’ here)
- Trimming: Removing parts of the video clip from either the beginning or the end.
Splitting a video:
- In the timeline, drag and drop your video.
- Click the timeline where you want to split the video.
- Right-click and select ‘Split page’ or press S on your keyboard.
Cutting or removing part of a video:
- After splitting a video, we can select one of the parts and press delete key to delete that part of the video.
- To split a very short or specific part you can also split the video twice and remove a part of the video.
Trimming a video:
- On the timeline, click on the video you want to trim.
- On the toolbar above the editor, click the icon. You’ll see highlighted and greyed-out parts of your video above the editor.
- Drag any of the sliders on the ends of the highlighted part of the video to shorten or lengthen it.
- Click on Done to save.
Difference between splitting, cutting and trimming a video

Adding transitions in a video
You can add transitions in your video using the following steps:
- To add a transition, please click the plus icon and select the add transition icon.
- In the side panel multiple transitions are available.
- After selecting a transition, you will find options like duration, direction and select apply between all pages.
Creating a Presentation from a Blank Version
If you want to create a design without a template, then you have to click the blank option on the home page.
- Step 1: Click on “Presentation” and choose “Create Blank”.
- Step 2: By default the name of the presentation is “Untitled Design”; you can rename the presentation.
- Step 3: Now you can add background, photos, graphics or videos to the slide by clicking on the elements in the object panel. Some of the elements are shapes, graphics, tables, photos, videos, audio, charts and frames.
- Step 4: Uploads in the object panel can be used for uploading images, videos or audio.
Adding a new slide
A new page can be added between two slides by clicking on the + sign or at the end.
Adding Transitions
- Step 1: Click the “Add Transition” Icon
- Step 2: Choose a transition style.
- Step 3: Adjust duration
- Step 4: Select Direction (if available)
- Step 5: Preview and apply
Applying Animations
- Step 1: Select what you want to animate.
- Step 2: Click “Animate” on the toolbar.
- Step 3: Choose the animation type, like page animations, element animations, photo animations or text animations.
- Step 4: Customise the animation.
- Step 5: Preview and apply
- Step 6: To preview an animation, hover your mouse cursor on it.
- Step 7: To apply an animation, click on it.
- Presenting a Design: A presentation can be presented in full screen, presenter view or autoplay.
- Sharing a design in Canva: One of the best features of Canva is the Share feature, where we can share our design by clicking the Share button.
Downloading a design in Canva
- Step 1: Select What You Want to Animate
- Step 2: Click “Animate” on the Toolbar
- Step 3: Choose the Animation Type
- Step 4: Customise the Animation
- Step 5: Preview and Apply
Adding audio to videos and presentations
- Step 1: Access the Audio Panel
- Step 2: Browse and Select Tracks
Timeline Controls and Audio Editing
Once your track is added, use the timeline editor at the bottom:
Ellipsis Menu Options
- Step 1: Copy & Paste audio tracks
- Step 2: Duplicate (retains length and volume settings)
- Step 3: Delete unwanted tracks.
- Step 4: Split audio and drag segments to different parts of the video.
Canva and Artificial Intelligence (AI)
What Is Canva’s Magic Studio?
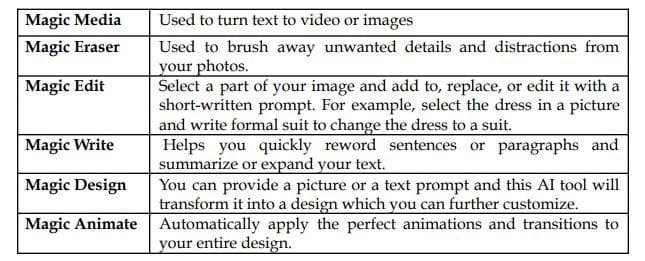
Magic Studio is powered by AI tools that simplify and elevate your design process. It is prominently featured in the menu, making it easy to explore and use.
Some of Canva’s new AI-powered tools include:

How to become a music composer using AI in Canva
Here’s a fun activity for you to create original music using AI.
- Step 1: Click Apps on the Object Panel.
- Step 2: Search for an AI music generator.
- Step 3: Choose any app.
- Step 4: Give a prompt for the music and set the time to 10 seconds.
Introduction to Adobe Express
Adobe Express is also known as Adobe Spark. Adobe Express is an American software company headquartered in San Jose, California. It is a user-friendly content creation and graphic design tool developed by Adobe Inc. Adobe Express was designed for nonprofitable organisations like schools, educational institutes, etc. Adobe Express can create branded content, such as flyers and logos, post social media content and edit PDF documents using artificial intelligence.
Advantages of using Adobe Express
- You can combine multiple video clips, artwork, animation and music using drag-and-drop options.
- You can do the task using one click.
- Generate extraordinary text effects and images instantly.
- Collaborate and comment on files in real time with your team.
Adobe Express for Education
It is free for students and educators, including Adobe Express and Photoshop Express. It is ideal for creating photos, reports, newsletters, flyers and posters.
Getting Started in Adobe Express
Adobe System Requirements
The minimum system and technical requirements for creating content using Adobe Express are:

Creating a Design Using Adobe Express Template
- Step 1: Browse Templates
- Step 2: Filter and Search
- Step 3: Add and Style Text
- Step 4: Add Media
- Step 5: Replace Images or Videos
- Step 6: Animate Your Design
- Step 7: Add Design Elements
- Step 8: Customize Theme and Background
- Step 9: Download or Share
Creating an Original Design in Adobe Express
- Step 1: Start from the Homepage
- Step 2: Search for Media
- Step 3: Use “Your Stuff”
- Step 4: Add New Media
Disclaimer: We have taken an effort to provide you with the accurate handout of “Graphic Designing Using Canva and Adobe Express Class 12 Notes“. If you feel that there is any error or mistake, please contact me at anuraganand2017@gmail.com. The above CBSE study material present on our websites is for education purpose, not our copyrights. All the above content and Screenshot are taken from Web Application Class 12 Subject Code 803 CBSE Textbook, Sample Paper, Old Sample Paper, Board Paper and Support Material which is present in CBSEACADEMIC website, This Textbook and Support Material are legally copyright by Central Board of Secondary Education. We are only providing a medium and helping the students to improve the performances in the examination.
Images and content shown above are the property of individual organizations and are used here for reference purposes only.
For more information, refer to the official CBSE textbooks available at cbseacademic.nic.in
