Teachers and Examiners collaborated to create the Digital Documentation Class 9 Notes. All the important Information are taken from the CBSE Textbook Information Technology Class 9 Based on CBSE Board Pattern.
Digital Documentation Class 9 Notes
What is Word processing?
Word processing is the use of computer software to enter, edit, format, store, retrieve and print the document. The document can be a letter, notice, report, business correspondence, etc.
Limitations of using typewriter

- If there is any typing error, then the whole document should be replaced.
- Difficult to send the same letter to multiple persons using a typewriter.
- Typewriter does not have all the required characters or symbols.
- It is not possible to produce a document in the desired format using a typewriter.
Difference between manual typewriter and electronic typewriter
| Electronic Typewriter | Manual Typewriter |
|---|---|
| It is faster than electronic typewriter | Manual typewriter is slow |
| It is possible to make changes | Not possible to make changes |
| It has a screen | don’t have screen |
First commercially word processing software
WordStar was the first commercially word processing software and in beginning WordStar was the most widely used in computer.
Some of the features provided by popular word processors are as listed below.
- Create, edit, save, retrieve and print the document
- Select, copy and move the text from one place to another in the document.
- Change the font size, font style of the text in the document
- Check spelling and grammar
- Create table, modify the size of the selected rows, columns or cells
- Combine one or more documents
- Insert pictures or graphs within the document
- Print the selected text or selected pages of the document
What is LibreOffice?
LibreOffice is a free and open-source software which provide fully featured office productivity suite like, LibreOffice Writer, LibreOffice Calc, LibreOffice Impress and LibreOffice Base. Currently the version of LibreOffice is 6.0 and above are available.
Starting LibreOffice Writer
There is three different ways to open LibreOffice Writer –
- To start LibreOffice Writer in Windows, double click LibreOffice Writer shortcut, which is usually found on the computer desktop
- To start LibreOffice Writer, click on the Start or Windows button, select LibreOffice → LibreOffice Writer from application window.
- LibreOffice Writer, click on start and type the text “Writer” in the search field and select LibreOffice Writer.
Parts of the Writer window
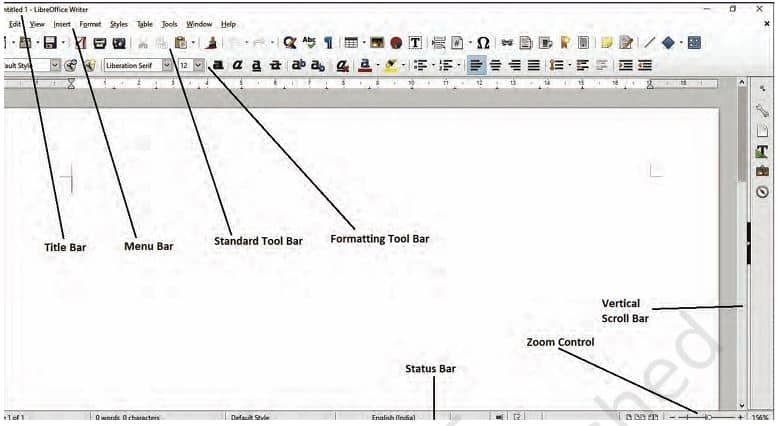
The various parts of the Writer window are –
- Title bar: Title bar is located on the top of Writer window. It shows the title of the currently opened document.
- Menu bar: It appears below the Title Bar. It shows the menu items File, Edit,
View, Insert, Format, Tables, Tools, Window and Help. - Toolbars: The tool bar appears below Menu Bar. By default, the Standard Tool Bar and Formatting Tool Bar will appear.
- Standard toolbar: It contains commands in the form of icons.
- Formatting toolbar: It contains the various options for formatting a document.
- Status bar: This is positioned at the left bottom of the Writer window and displays the number of pages, words, the language used, zooming, etc.
- Scroll button and scroll bar: It is used to scroll the document.
- Zoom: It allows to change the scale of the text and pictures in the document only for view.
Cursor movement
(a) Text Cursor Movement
There are two keys control the movement of cursor Home and End.
- Home key can jump to the beginning of the line.
- End key jump to end of the line.
- To jump to the beginning of a document (top of the page) press Ctrl+Home.
- To jump to the end of a document (end of the page) press Ctrl+End.
Editing the document
(a) Undo and Redo
- In document if you have made some changes and now you want to erase the last change done, then use the Undo option.
- After undo command, again if you want to go back then use the Redo option.
(b) Moving and copying text
Cut and Paste: It is used to move a selected text from one place to another.
- Select the text and click on Edit → Cut option or press CTRL+X for cut.
- Click on Edit → Paste option or press CTRL+V for paste.
(c) Copy and Paste
Copy used to make a duplicate copy of selected text.
- Click on Edit→ Copy option or press CTRL+C for copy.
- Click on Edit→Paste option or press CTRL+V for paste.
(d) Selecting criteria
There are several selection tricks to speed up the selection process as below.
| To select a letter or letters | Drag the Mouse across the letter(s) |
|---|---|
| To select a single word at a time | Double click in the word |
| To select a complete sentence at a time | Triple click anywhere in the sentence |
| To select a complete paragraph at a time | Quadruple click anywhere in the paragraph |
| A document | Press Ctrl + A on the key board |
(e) Selecting non-consecutive text items
Writer provides a way to select the non-continuous text using the keyboard and mouse. To select non-consecutive text, press the Ctrl key and select a separate word using the mouse.

(f) Selecting a vertical block of text
In LibreOffice Writer you can select vertical text using vertical block. Click on Edit > Selection Mode > Block Area and then click and drag your mouse vertically over the desired text area.

(g) Find and Replace
This feature is used to search for a text and replace it with other text. Click on Edit → “Find & Replace” dialog box to replace the text.
(h) Jumping to the page number
Some time we require to jump to a particular page number. It becomes difficult to scroll down if it is a large document with several pages. Click on Edit Menu→ Go to Page (Keyboard shortcut: Ctrl+G).
(i) Non-printing characters
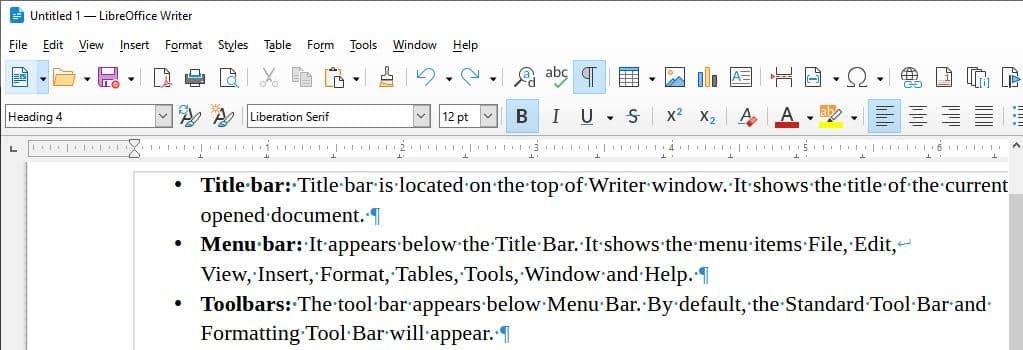
There are some character which does not appear in the screen is known as non-printing character, for example, Enter, the Space Bar, and the Tab key. To display the non-printing character, press the toggle
formatting mark (¶) or use keyboard shortcut Ctrl+F10. The tab space is shown by → sign and spacebar is shown by dot (.)
(j) Checking spelling and grammar
The LibreOffice Writer helps us to correct the spelling and grammar. It can be used separately or in combination with the spelling checker. Click on Tools → Spelling and Grammar, or click the Spelling and Grammar button on the Standard toolbar, or press the keyboard key F7.
(k) Using synonyms and the thesaurus
A word processor helps to look up synonyms (different words with the same meaning) and antonyms (words with the opposite meaning) in the thesaurus. Right-click on a word and point to Synonyms on the context menu. A submenu of alternative words and phrases are displayed.
Page Style
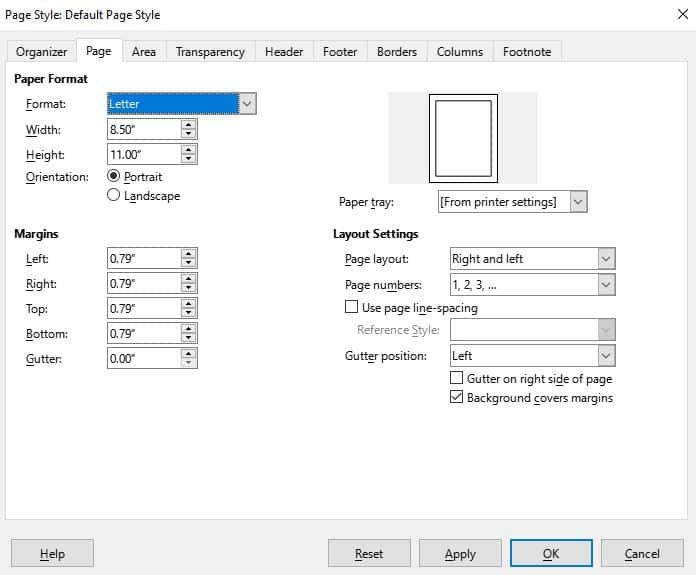
You can select paper size and format (A4, A5, B4, Letter). User can adjust ‘Orientation’ as Portrait or Landscape. The user can set the Margins (Left, Right, Top, Down).
Formatting a document
Formatting Text refers to the formatting of paragraphs and characters. To do the formatting, first select the text and then apply the required text formatting features.
(a) Removing manual formatting
To remove manual formatting. For this, select the text and choose Format → Clear Direct Formatting from the Menu bar, or click the Clear Direct Formatting button on the Formatting toolbar, or use Ctrl+M from the keyboard.
(b) Common text formatting
Some of the common text formatting features are:
- Changing font size – by selecting font size.
- Changing font style – bold, italic, underline
- Changing font type – by selecting font drop down.
- Changing font colour – by selecting font colour icon.
(c) Changing text case
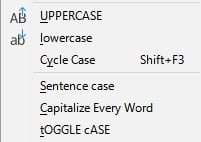
It is possible to change the case of the text. There are 6 Change Case options in LibreOffice Writer. Click on Format > Text > Lowercase, Uppercase, Sentence Case, Capitalize Each Word, or tOGGLE cASE.
- UPPER CASE
- lower case
- Cycle Case
- Sentence case
- Capitalize Every Word
- tOGGLE cASE
(d) Superscript and Subscript
- To apply superscript: Select the text and select Format → Text → Superscript
- To apply subscript: Select the text and select Format → Text → Subscript
Paragraph style
A paragraph in a document can have several sentences or a single sentence. Every paragraph in a LibreOffice Writer document has a paragraph style.
(a) Indenting paragraphs
Indenting paragraphs adds a blank space at the beginning of the paragraph or shifts the paragraphs to the right side or left side. There are two types of indent: increase indent and decrease indent.
(b) Aligning paragraphs
The paragraph can be aligned as Left, Right, Center and Justify. To align the paragraph, place the text cursor in the title paragraph, select the appropriate tool (Left, Right, Center or Justify) from the Format Toolbar. If you align Left (Ctrl+L), Center Horizontally (Ctrl+E), Aligned Right (Ctrl+R) and Justified (Ctrl+J).
(c) Font colour, highlighting, and background colour
There are three more tools—Font Color, Highlighting, and Background tools on the Format Toolbar.
(d) Using the bullets and numbering
You can assign the bullets or numbering to the list items in the document by using the options on the Bullets and Numbering toolbar. Bullets starts form expression that include characters and numbering starts form numbers or characters.
(e) Assigning colour, border and background
To assign border to the paragraph, select the paragraph, then select Format → Paragraph → Borders → Select Line – Style, Width, Colour.
Page Formatting
(a) Setting up basic page layout using styles
Page styles define the basic layout of all pages in the document. It includes page size, margins, header and footer, border and background, number of columns, etc.
(b) Inserting a page break
In certain cases we may require to break the current page and move the next heading or next chapter to the new page in the same document. To break the current page and start the new page select Insert → Page Break from the Menu bar or use the keyboard command (Ctrl + Return).
Headers appear at the top of every page; footers appear at the bottom of a page. Headers and footers are specified by page styles.
- To insert header in the document, select Insert → Header and Footer → Header
- To insert footer in the document, select Insert →Header and Footer → Footer
(d) Defining borders and backgrounds
Assigning borders and backgrounds to important paragraphs, frames and pages give attractive look to the document.
- Adding border: It is possible to apply the border, either to individual characters or to selected text.
- Adding background colour: To add background color to the paragraph, select the paragraph and add the color from the color grid.
(e) Inserting images, characters in a document
The regular text in the document can be made attractive and more informative by inserting the various elements as listed below.
- Inserting image: To insert an image in your document, position the cursor where you want to insert the file, select Insert → Image.
- Inserting special characters: We may require entering the special character, such as ¶, ©, §, √ etc. To do this click on Insert → Special Character.
- Inserting shapes: It is possible to insert various shapes in your document. The variety of shapes consists of Lines, Arrows, Symbols, Stars, Callouts, Flowcharts. To add the shape click on Insert → Shape.
(f) Dividing the document page into column
You may have seen some documents where its page is divided into two or three columns. It is used in magazines and newspapers. To divide the page into columns, select Format → Column.
(g) Formatting the shape or image
User can format the shape or image inserted in the document. For example, user can change its size, colour, add borders, change its position, etc.
Creating and managing tables
The representation of data in a tabular format is called as table. In a document it is normally seen that some data are represented in tabular form. example of representing your school timetable, your marksheet, your teachers teaching various subjects. To represent such data, you have to create a table.
(a) Creating a table
The simplest way to create a table is, click the Table icon on the Standard toolbar or Select Table → Insert Table from the Menu bar or Press Ctrl+F12.
(b) Inserting rows and columns
To insert one row or column in the table:
Choose Insert → Rows Above/Below or Insert → Columns Above/Below. Set number to define the number of rows or columns to be inserted and select the Position as Before or After.
(c) Deleting rows and columns
To delete one or more rows or columns, place the cursor in the row or column you want to delete and do one of the following:
(d) Splitting and merging tables
One table can be split into two tables, and two tables can be merged into a single table. Tables can only be split horizontally.
- To split a table – Choose Table → Split Table from the Menu bar.
- To merge two tables – Chose Table and click on Table → Merge Table from the Menu bar.
(e) Deleting a table
Click anywhere in the table and choose Table → Delete Table from the Menu bar, to delete table.
(f) Copying a table
Click anywhere on the table and click on Menu bar choose Table → Select → Table or press Ctrl+C or click the Copy icon on the Standard toolbar.
(g) Moving a table
Click anywhere in the table and click on Menu bar, choose Table → Select Table or press Ctrl+X or click the Cut icon in the Standard toolbar.
Printing a document
To quickly print the document without any option, Click the Print icon. The entire document will be sent to the default printer defined for your computer.
- Print preview – Print Preview is useful to check the document before printing.
- Controlling printing – To print the document with certain options, use the Print dialog (File → Print or Ctrl+P).
Printing all pages, single and multiple pages
There are three options to print the number of pages in a document.
- To print all the pages in sequence, choose the option All pages.
- To print a single page, or number of non-consecutive pages give the range of pages first and last page.
- To print only the selected text, choose the option, Selection.
Mail Merge
Mail Merge is a very important feature of word processor. It is used to create a series of same documents with multiple addresses. Mail merge is the process of merging the main document (letter or certificates) with the mailing address of various persons. A data source is a set of mailing addresses in the form of a rows and columns generally called database.
Employability skills Class 9 Notes
- Unit 1 – Communication Skills Class 9 Notes
- Unit 2 – Self-Management Skills Class 9 Notes
- Unit 3 – Basic ICT Skills Class 9 Notes
- Unit 4 – Entrepreneurial Skills Class 9 Notes
- Unit 5 – Green Skills Class 9 Notes
Employability skills Class 9 MCQ
- Unit 1 – Communication Skills Class 9 MCQ
- Unit 2 – Self-Management Skills Class 9 MCQ
- Unit 3 – Basic ICT Skills Class 9 MCQ
- Unit 4 – Entrepreneurial Skillls Class 9 MCQ
- Unit 5 – Green Skills Class 9 MCQ
Employability skills Class 9 Questions and Answers
- Unit 1 – Communication Skills Class 9 Questionns and Answers
- Unit 2 – Self-Management Skills Class 9 Questions and Answers
- Unit 3 – Basic ICT Skills Class 9 Questions and Answers
- Unit 4 – Entrepreneurial Skills Class 9 Questions and Answers
- Unit 5 – Green Skills Class 9 Questions and Answers
Information Technology Class 9 Notes
- Unit 1 – Introduction to IT-ITeS Industry Class 9 Notes
- Unit 2 – Data Entry and Keyboarding Skills Class 9 Notes
- Unit 3 – Digital Documentation Class 9 Notes
- Unit 4 – Electronic Spreadsheet Class 9 Notes
- Unit 5 – Digital Presentation Class 9 Notes
Information Technology Class 9 MCQ
- Unit 1 – Introduction to IT-ITeS Industry Class 9 MCQ
- Unit 2 – Data Entry and Keyboarding Skills Class 9 MCQ
- Unit 3 – Digital Documentation Class 9 MCQ
- Unit 4 – Electronic Spreadsheet Class 9 MCQ
- Unit 5 – Digital Presentation Class 9 MCQ
Information Technology Class 9 Questions and Answers
- Unit 1 – Introduction to IT-ITeS Industry Class 9 Questions and Answers
- Unit 2 – Data Entry and Keyboarding Skills Class 9 Questions and Answers
- Unit 3 – Digital Documentation Class 9 Questions and Answers
- Unit 4 – Electronic Spreadsheet Class 9 Questions and Answers
- Unit 5 – Digital Presentation Class 9 Questions and Answers
Disclaimer: We have taken an effort to provide you with the accurate handout of “Digital Documentation Class 9 Notes“. If you feel that there is any error or mistake, please contact me at anuraganand2017@gmail.com. The above CBSE study material present on our websites is for education purpose, not our copyrights. All the above content and Screenshot are taken from Information Technology Class 9 CBSE Textbook and Support Material which is present in CBSEACADEMIC website, This Textbook and Support Material are legally copyright by Central Board of Secondary Education. We are only providing a medium and helping the students to improve the performances in the examination.
For more information, refer to the official CBSE textbooks available at cbseacademic.nic.in

This is a very nice!!
Hi everyone
Its very helpful
I do not get any problem while reading
Read easily without problem
You all should read
That’s all
And special thanks to the website
Thank u????????
Its very amazing and helpful to our exams
Thanks a lot
I suggest u
You also upload application based question
All are good
Thank u again????
it is verry helpfull
should be able to download these resources, overall is good
Yes you are correct