Teachers and Examiners (CBSESkillEduction) collaborated to create the Digital Presentation Class 9 Notes. All the important Information are taken from the CBSE Textbook Information Technology Class 9 Based on CBSE Board Pattern.

Digital Presentation Class 9 Notes
What is digital presentation?
A presentation is a method that we use to convey a topic to an audience. Presentation is used to present the project proposal in business organisations. Presentation is highly used in teaching and training.
A presentation includes
- Regular text
- Lists items
- Table
- Graphics elements
- Sound and Video
- Animation
Characteristics of a good quality presentation
- Number of lines – In a single slide, only 5 to 8 lines can be included, which makes the slide small.
- Font-size – You can set the appropriate size of text depending on the room size and distance between the screen and the audience.
- Correct use of grammar and language – You must present the contents error-free in terms of grammar and spellings of language.
- Inserting images, drawings, tables, or graphs – Try to avoid inserting more than two graphics (images, drawings, tables, or charts) in any slide.
- Use of colours – Try to use dark colours and bold letters with different fonts to highlight certain points and use fair or silent background colours.
- Animation and videos – A slide should not contain more than one animation or video.
- Pay attention to the target group – Focus on the contents and sequence of the topics in such a way that it makes a flow to attract the attention of the audience from the objectives.
Getting started with LibreOffice Impress
Starting LibreOffice Impress
To start LibreOffice Impress, just double click its shortcut icon on the desktop or click on the
Start or Windows button, select LibreOffice → LibreOffice Impress from application window
In Ubuntu Linux, open the LibreOffice Impress by any of the following options.
- Find the LibreOffice Impress icon on the application launcher, and click it to start the application.
- Find the LibreOffice Impress icon through “Show Applications” icon on the launcher.
Parts of Impress window
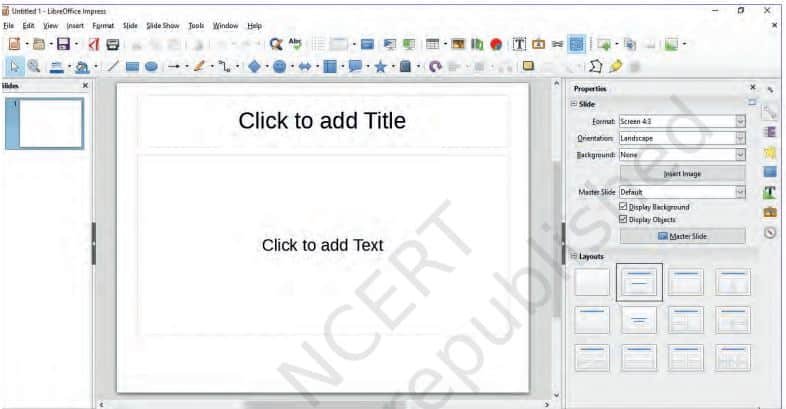
- Title bar – It contains the name of presentation file with extension (.odp) and it is always of the top of the LibreOffice Impress window.
- Menu Bar – It contains the menus with logically grouped commands.
- File: File menu is used to perform basic operations on the presentation (saving, opening creating a new one, etc.).
- Edit: This menu contains functions for copying, cutting and pasting text.
- View: It is used for window view adjustment (different view types are selected, zooming, etc.).
- Insert: This menu is used to insert various objects like tables, shapes, textbox, and charts into a presentation.
- Format: It contains functions for text formatting.
- Slide: It is used to insert new slide, duplicate slide or delete slide.
- Slide show: It is a tool for viewing presentations.
- Tools: They are used to control spelling in a presentation.
- Window: It is used for viewing already opened presentations.
- Help: It is used to see the help of any topic on Impress.
- Various toolbar – There are various toolbar to manage GUI of Impress.
- Standard Toolbar – Each menu of the menu bar are placed here as icons for easy operations.
- Slide pane – It is a vertical pane to see the slide in small size to navigate on any slide easily.
- Workspace: This is the central part of the window, where the presentation slides are created, text is entered, images and other objects are inserted.
- Slides – This is in the left part of the window, display presentation slides in the thumbnail form.
- Tasks pane – Task pane is on the right part of the window. Task pane is made up of five components Master pages, Layouts, Table design, Custom animation and Slide transition.
- Master pages – You can make the presentation base and the common style for all slides.
- Layouts – You can prepare your own layout and keep these safe for future use using this software.
- Table design – This gives styles for creating tables.
- Custom animation – Using this feature you can add, change or remove animation features.
- Slide transition – Using slide transition, you can set the way, how the slide will appear during presentation like speed of transition, sound effects, automated transition, etc.
- Drawing toolbar – Using drawing toolbar, you can make various artistic works in the presentation to make your presentation effective.
- Insertion point – It is a location of the cursor where your text will appear as you type anything (means location where the cursor is blinking).
- Status bar – It displays information about the active presentation, the current position of the cursor and the zoom slider.
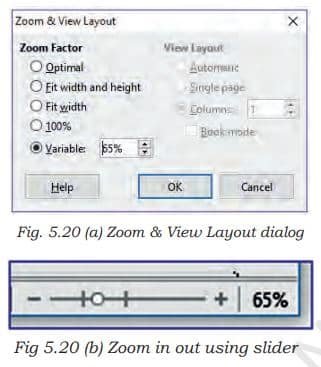
- Zoom control – This tool is used to zoom in or zoom out the slide.
Closing LibreOffice Impress
To close the Impress application directly, select the manipulation button Close (×), or select the File Menu→Exit command or use the keyboard shortcut Alt+F4 or Ctrl+Q.
Creating a Presentation
Creating a presentation using template
- To create a new blank presentation, select the File Menu→New–>Templates or click on the icon New or use the combination of keys Ctrl+N.
- Choose a template as per your choice by clicking on the template.
- Prepare your presentation using template.
- Now you can use either a blank layout or one of the title layouts as per your presenation.
Selecting slide layout
The slide layouts means how text and graphics will be displayed in the slide, just like placeholder boxes with formats. There are six different types of slide layouts, the first slide layout will be ‘blank slide’.
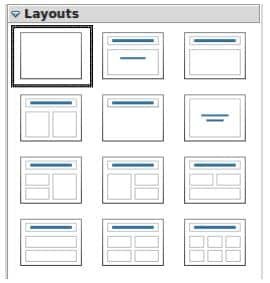
(a) Adding text: To add text to a slide that contains a text frame, click on Click to add text in the text frame and then type your text.
(b) Saving a presentation: While creating a presentation, you can save it to the disk with some name, so that the content may not be lost or to use the presentation further.
(c) Running a slide show: To run the slide show, click Slide Show→Start from First Slide on the main menu bar or Click the Slide Show icon on the Presentation toolbar or the Slide Sorter toolbar or Press F5. The slide show starts to run.
- Saving a presentation as HTML: To publish the presentation on the web you have to save it in HTML format (HyperText Markup Language), which could be opened in any web browser. To save the presentation as html click on File → Export.
- Save a file in PDF format: A Portable Document Format (PDF) of the presentation can be created by saving a file in the PDF format click on File → Export as PDF.
(d) Closing a presentation: To close a presentation, select File Menu→ Close or use the keyboard shortcut keys Ctrl+W.
(e) Using Help: Help function is located in the Help menu. The quickest way to open the Help function is by using the F1 function key.
Working with slides
The new slide can be inserted into the presentation by inserting a new slide as well as inserting a duplicate slide.
Inserting a duplicate slide
Inserting a duplicate slide will insert the copy of the existing or current slide into the presentation. Select from menu bar Slide → Duplicate Slide, right-click on the slide and select Duplicate Slide, or click the Duplicate Slide icon in the Presentation toolbar.
Inserting new slides
To insert a new slide, use any of the following way.
- Select from menu bar Slide → New Slide.
- Or, right-click on a slide and select New Slide from the context menu.
- Or, right-click in an empty space in the Workspace and select Slide → New Slide from the context menu.
- Or, click the New Slide icon in the Presentation toolbar.
- Or, use the keyboard shortcut Ctrl+M
Copying and moving slides
The slides once created can be reused within the presentation or in another presentation. To move the
slide to another location use cut and paste process. To copy the slide, use the process of copy and paste.
- Cut and paste: To cut and paste something in a presentation, right click the mouse button and select the cut option or copy option from the context menu.
- Using keyboard shortcuts: Cut, Copy and Paste operations can also be performed by the combination of keys:
- Cut – Ctrl + X
- Copy – Ctrl + C
- Paste – Ctrl + V
- Drag and drop copying and moving method: The copy, cut and paste operations can also be performed by ‘Drag and Drop’ method.
- Deleting slides: To delete any slide from a presentation, first it should be selected and then right click and select Delete Slide option in the context menu.
- Renaming a slide: The slides are named as slide1, slide2,… by default, right click and select Rename slide option in the context menu
Copying, moving and deleting content
To copy or move some text or an object in the presentation to another location, it is necessary to first
- Step 1: Select the text and click the right mouse button
- Step 2: Click the cut or copy option from the context menu
- Step 3: Select the location where you want ot past
- Step 4: Press the right mouse button once again and click on paste option from the context menu.
(a) Deleting the text: It is easy to delete the text of the slides. The delete and backspace button on keyboard is used to delete the text. The delete key deletes the character on the right of the cursor, and the backspace button deletes the character on the left of the cursor.
(b) Undoing and returning the changes: Impress keeps the history of recent changes made. When we execute a command on some text, for example delete the text, we are able to reverse what we have done. This is known as the undo function.
View a presentation
The presentation created in Impress can be viewed in a number of ways.
Controlling the size of the view
Zoom and View Layout dialog box is used to control the size of the view and zoom slider on the Status bar has two marked sections increase slide and decrease slide. You can increase and decrease the zoom slide.
Workspace views
The various workspace views are in the drop-down list of the View menu. These views are Normal, Outline, Notes, Slide Sorter, Slide Master, Notes Master, Handout Master.
- Normal view: it is the main view for working with individual slides. This view is used to format and design and to add text, graphics, and animation effects.
- Outline view: it contains all the slides of the presentation in a sequence. It shows each slide in the outline format.
- Notes view: it is used to add notes to a slide for the information of presenter. It is not seen by the audience while showing the presentation.
- Slide Sorter view: it contains all of the slide thumbnails. It is suitable for rearranging the slide order. It is used to sort slides with the ‘drag and drop’ method.
Formatting text
The contents of the slides can be formatted in various ways. The most common way is to use the formatting icons on the Formatting toolbar.

- Font name: Click on the font type drop-down and select a font name.
- Size: Click on the font size drop-down and select the font size.
- Increase font size: Clicking on a with upward arrow, will increase the size of the text or use keyboard shortcut Ctrl+].
- Decrease font size: Clicking on a with downward arrow, will decrease the size of the text or keyboard shortcut Ctrl+[.
- Bold: Clicking on a changes the text to bold or keyboard shortcut Ctrl+B.
- Italic: Clicking on a changes the text to italic or keyboard shortcut: Ctrl+I.
- Underline: Clicking on a changes the text to underline or keyboard shortcut: Ctrl+U.
- Strikethrough: Clicking on a draws a line through the selected text.
- Superscript : Clicking on ab raises the selected text above baseline or keyboard shortcut Shift+Ctrl+P.
- Subscript: Clicking on ab lowers the selected the text above baseline or Keyboard shortcut Shift+Ctrl+B.
- Font colour: Clicking on drop-down box (▼) to the right of font colour icon opens the colour pallet from where you can change the font colour.
- Highlighting: Clicking on drop-down box (▼) to the right of highlight colour icon opens the colour pallet from where you can change the highlight colour.
- Alignment: The alignment icons are used to align the text to the Left, Center, Right, or Justify.
- Bullets and numbering: Creates a bulleted or numbered list from selected paragraphs.
Working with tables
Inserting tables
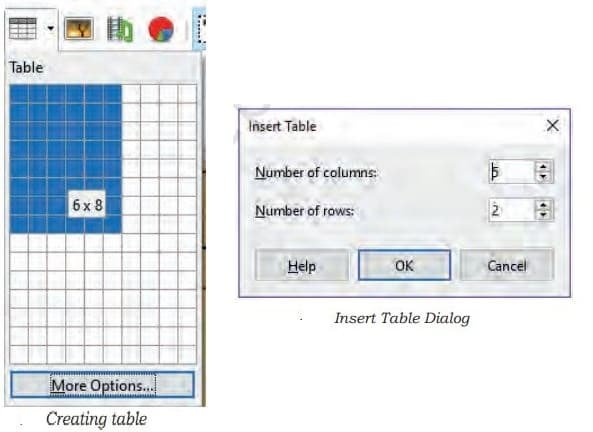
Tables are inserted by selecting the Table icon on the Standard toolbar, or by selecting the Table command on the Insert tab. In the Insert Table dialog box, the Number of columns and the Number of rows are specified.
Entering and editing data in a table
The content is put in table by placing the insertion point in a table cell and entering text. Moving the insertion point in a table can be done in three ways:
- by pressing the left mouse button
- by pressing the TAB key on a keyboard
- by using arrow keys on the keyboard
Adjusting column width and row height using the mouse
To change the width of the column, position on the border line between the two columns, and when the cursor changes to a (↔) sign, press the left mouse button, hold and drag it until the column achieves the desired width. The same can be done for adjusting the row height.
Table borders and background
The borders and background can be assigned to the table. To do this, right click on the table border, the Table Properties dialog box will open, from where you can change the borders and background of the table.
Deleting a table
To delete a table, Click on the slide and drag a selection box over the table to select it, then press the Delete key, Or Click on the table border to select the table and press the Delete key.
Adding and formatting images
Images can be inserted from the gallery, files stored in the computer.
Inserting an image from a file
To insert an image into presentation, select Insert → Image on the menu bar or, click on the Insert Image icon located on the standard toolbar.
Inserting an image from the gallery
To insert an image from the gallery, select Insert → Media → Gallery from the menu.
Formatting images
Formatting an image includes moving, resizing, rotating an image. The image inserted into a resentation can be formatted.
Moving images
- To move the image in the slide, click on an image, observe that the cursor changes to hand shape.
- Click and drag the picture to the desired position.
- Release the mouse button.
Resizing images
- Select the image by clicking on it. Observe that selection handles displayed.
- Position the cursor over one of the selection handles. The cursor changes the shape giving a graphical representation of the direction of the resizing.
- Click and drag to resize the image.
- Release the mouse button when satisfied with the new size.
Rotating images
The image can be rotated in any direction using the Rotate icon. To manually rotate an image, Select the image to display the selection handles and click the Rotate icon on the Line and Filling toolbar.
Formatting using the Image toolbar
When an image is selected, the Image toolbar becomes available under the Properties window. This toolbar provides a number of formatting options. The Image toolbar can also be displayed by selecting View → Toolbars→Image from the menu bar.
Managing graphic objects
Impress provides various drawing tools. The Drawing toolbar having the majority of the tools used to create graphical objects.

- Drawing lines: To draw a line using drawing line option.
- Drawing shapes: As similar to drawing a line, you can draw shapes by selecting the desired shapes from the available selection
Grouping and ungrouping objects
More than one object can be grouped together and treated as a single object. A group formed by grouping the objects can be formatted as a single object, moved, rotated, deleted, and so on.
- To select all the objects, go to Edit → Select All or use keyboard combination Ctrl+A.
- Go to Format→Group on the main menu bar or use the keyboard combination Ctrl+Shift+G to group the object.
Note: To ungroup objects, go to Format → Group → Ungroup on the menu bar or use the keyboard combination Ctrl+Alt+Shift+G.
Working with Slide Masters
Slide master contorls the background color, gradient or graphich of the all the slide in presentation. Impress comes with various slide masters. These slide masters are available in the Master Pages section of the Sidebar. There are three subsections:
- Used in this Presentation
- Recently Used
- Available for Use
Adding transitions
Slide Transitions is a animation between two slides:
- In the Sidebar, select the Slide Transition icon to open the Slide Transition section.
- In the Slides pane or Slide Sorter view, select the slides to apply the transition.
- In the Apply to selected slides list, select a transition.
- Modify the selected transition by changing the speed or adding a sound.
- If a sound is selected, the Loop until next sound option becomes active.
- Select how to advance to the next slide: manually (By mouse click) or automatically (Automatically after).
- To apply transition to all slides, click Apply to All Slides.
- To start the slide show from the current slide, check transitions, click Slide Show.
Employability skills Class 9 Notes
- Unit 1 – Communication Skills Class 9 Notes
- Unit 2 – Self-Management Skills Class 9 Notes
- Unit 3 – Basic ICT Skills Class 9 Notes
- Unit 4 – Entrepreneurial Skills Class 9 Notes
- Unit 5 – Green Skills Class 9 Notes
Employability skills Class 9 MCQ
- Unit 1 – Communication Skills Class 9 MCQ
- Unit 2 – Self-Management Skills Class 9 MCQ
- Unit 3 – Basic ICT Skills Class 9 MCQ
- Unit 4 – Entrepreneurial Skillls Class 9 MCQ
- Unit 5 – Green Skills Class 9 MCQ
Employability skills Class 9 Questions and Answers
- Unit 1 – Communication Skills Class 9 Questionns and Answers
- Unit 2 – Self-Management Skills Class 9 Questions and Answers
- Unit 3 – Basic ICT Skills Class 9 Questions and Answers
- Unit 4 – Entrepreneurial Skills Class 9 Questions and Answers
- Unit 5 – Green Skills Class 9 Questions and Answers
Information Technology Class 9 Notes
- Unit 1 – Introduction to IT-ITeS Industry Class 9 Notes
- Unit 2 – Data Entry and Keyboarding Skills Class 9 Notes
- Unit 3 – Digital Documentation Class 9 Notes
- Unit 4 – Electronic Spreadsheet Class 9 Notes
- Unit 5 – Digital Presentation Class 9 Notes
Information Technology Class 9 MCQ
- Unit 1 – Introduction to IT-ITeS Industry Class 9 MCQ
- Unit 2 – Data Entry and Keyboarding Skills Class 9 MCQ
- Unit 3 – Digital Documentation Class 9 MCQ
- Unit 4 – Electronic Spreadsheet Class 9 MCQ
- Unit 5 – Digital Presentation Class 9 MCQ
Information Technology Class 9 Questions and Answers
- Unit 1 – Introduction to IT-ITeS Industry Class 9 Questions and Answers
- Unit 2 – Data Entry and Keyboarding Skills Class 9 Questions and Answers
- Unit 3 – Digital Documentation Class 9 Questions and Answers
- Unit 4 – Electronic Spreadsheet Class 9 Questions and Answers
- Unit 5 – Digital Presentation Class 9 Questions and Answers
Disclaimer: We have taken an effort to provide you with the accurate handout of “Digital Presentation Class 9 Notes“. If you feel that there is any error or mistake, please contact me at anuraganand2017@gmail.com. The above CBSE study material present on our websites is for education purpose, not our copyrights. All the above content and Screenshot are taken from Information Technology Class 9 CBSE Textbook and Support Material which is present in CBSEACADEMIC website, This Textbook and Support Material are legally copyright by Central Board of Secondary Education. We are only providing a medium and helping the students to improve the performances in the examination.
For more information, refer to the official CBSE textbooks available at cbseacademic.nic.in

It is very useful for my exam
It is very useful for our exam preparations