In Class 9 Computer subject, students learn about common office tools such as word processors, spreadsheets, and presentation software. These tools make everyday tasks like writing reports, calculating data, and creating presentations easier and more professional. Understanding the basic features of office tools builds a strong foundation for future computer learning and digital skills.
Office Tools Class 9 Notes
What is a word processor?
A word processor is important application software for creating, editing, formatting, and saving text in a computer system. Some of the popular word processing software are Microsoft Word, Google Docs, and LibreOffice Writer. A word processor helps to manage the document more efficiently and professionally.
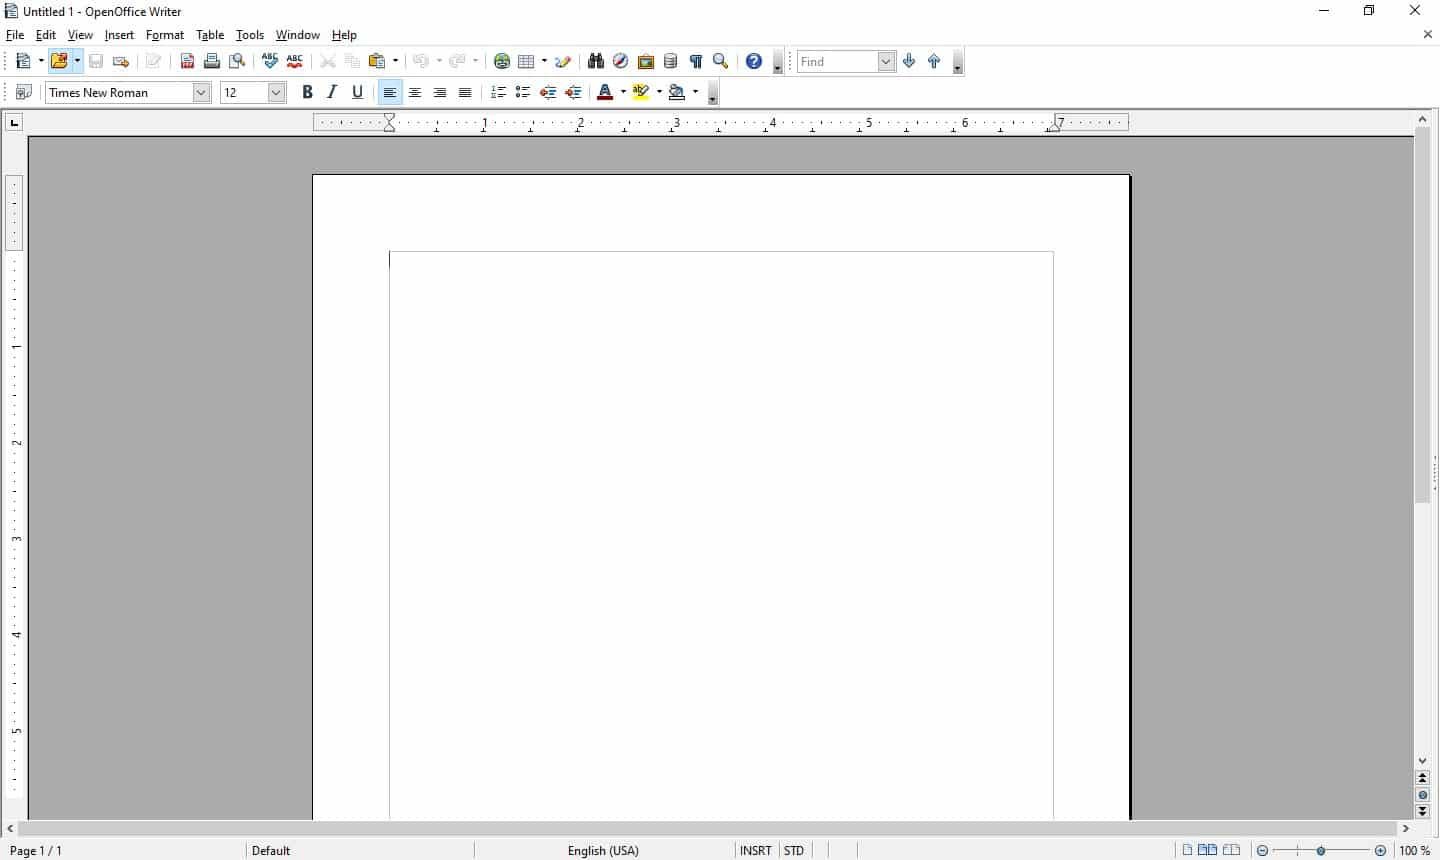
Opening a new document
The steps for opening a new document are:
- Step 1: Click on the Start Menu
- Step 2: Click on OpenOffice Writer.
Create a new document.
The steps for creating a new document are
- Step 1: Click on File from the menu bar.
- Step 2: Click on Blank Document.
Saving a new document
The steps for saving a new document are:
- Step 1: Click on File from the menu bar.
- Step 2: Click on Save As.
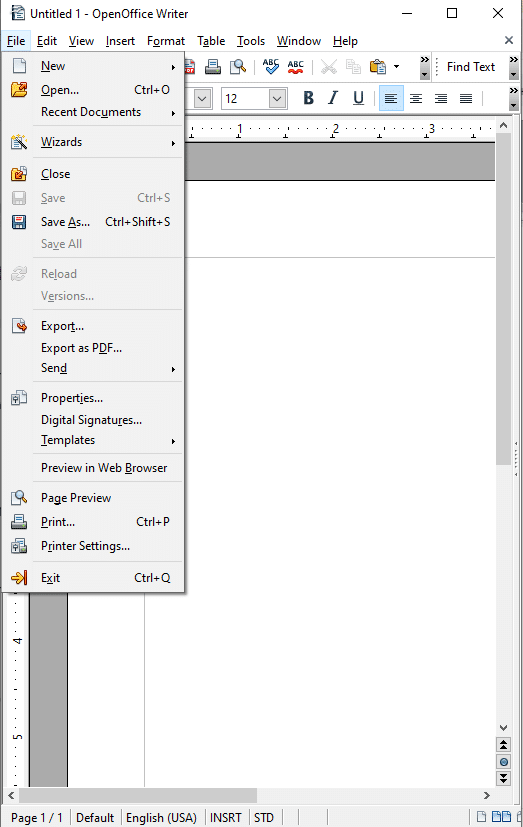
Parts of the Writer window
The various parts of the Writer window have been briefly explained below.
- Title bar: The title bar is located on the top of the Writer window. It shows the title of the currently opened document.
- Menu bar: It appears below the title bar. It shows the menu items File, Edit, View, Insert, Format, Tables, Tools, Window, and Help.
- Toolbars: The toolbarappears below the menu bar. By default, the Standard Tool Bar and Formatting Tool Bar will appear.
- Standard toolbar: It contains commands in the form of icons.
- Formatting toolbar: It contains the various options for formatting a document. A graphical representation of commands is shown in the form of icons.
- Status bar: This is positioned at the left bottom of the Writer window and displays the number of pages, words, the language used, zooming, etc. It is located at the bottom of the workspace.
- Scroll button and scroll bar: It is used to scroll the document.
Formatting a document
Formatting is a style given to the text. There are a lot of different types of features available to give format to the text or paragraph.
- Bold (B): Bold helps to highlight important words or sentences. The shortcut key for Bold is Ctrl + B.
- Italic (I): Italic helps to emphasize or stylize text in italic format. The shortcut key for italic is Ctrl + I.
- Underline (U): Underlining options helps to add a line below the text. The shortcut key for underline is Ctrl + U.
- Font type: Font type is also known as font face. Font type is a style where you can change the appearance of the text, like Arial, Times New Roman, or Calibri, etc.
- Font size: Font size is used to make text larger or smaller, for example, 12 pt.
- Text Color: Text Color is used to change the color of the text, paragraph, or heading.
- Alignment of text: There are four default different types of alignment: left, right, center, and justify.
Format paragraphs with line and/or paragraph spacing.
Line Spacing
Line spacing controls the amount of vertical space between lines in a paragraph. Steps for creating inline space are
- Step 1: Format >> Paragraph
- Step 2: In the Indents and Spacing tab.
- Step 3: Select line spacing using the dropdown, like single, 1.5 lines, double, proportional, fixed, etc.
Paragraph spacing
Paragraph spacing adds space before or after a paragraph. The steps for adding paragraph spacing are
- Step 1: Click on Format >> Paragraph.
- Step 2: In the Indents & Spacing tab
- Step 3: Select above paragraph or below paragraph.
- Step 4: Click on OK.
Headers appear at the top of every page, and footers appear at the bottom of every page. Headers and footers are specified by page styles; therefore, all the pages with the same page style will display the same header and footer.
- To insert a header in the document, select Insert → Header and Footer → Header.
- To insert a footer in the document, select Insert → Header and Footer → Footer.
Using the bullets and numbering
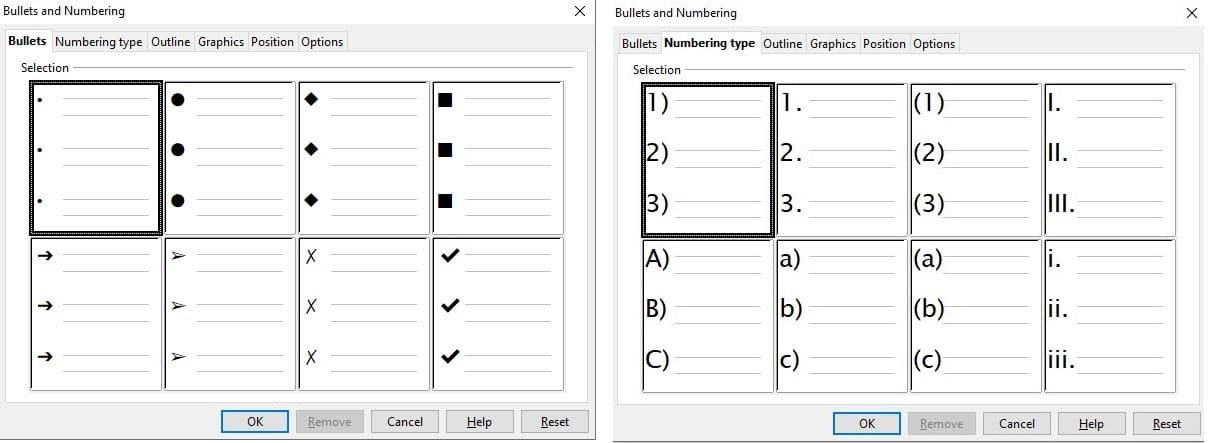
You can assign the bullets or numbering to the list items in the document by using the options on the Bullets and Numbering toolbar. You can also create a nested list by using the buttons on the Bullets and Numbering toolbar. The general options available for bullets and numbering.
Checking spelling and grammar
The Writer helps us to correct the spelling. It also provides a grammar checker to check the grammar of the sentence. It can be used separately or in combination with the spelling checker. This is one of the important features of OpenOffice Writer. If any grammatical errors are detected, they are underlined by a wavy blue line.
Tools → Spelling and Grammar, or click the Spelling and Grammar button on the Standard toolbar, or press the keyboard key F7.
Subscript and Superscript
For example, on the date 5th/sup> July, the ‘th’ character appearing after 5 is in the superscript case. In some situations, such as while writing scientific/chemical formulas, such as O₂, the character 2 is in the subscript case. Now, in our example, change the 5th of July to the 5th of July.
- To apply superscript: Select the text and select Format → Text → Superscript.
- To apply subscript: Select the text and select Format → Text → Subscript.
Insert symbols.
To insert symbols in OpenOffice Writer, go to the insert menu at the top and select the special character dialog box.
Use print preview.
Print Preview is useful to check the document before printing. A user can check whether the document is prepared as needed, such as indentation, borders, etc.
Print a document.
One can select the printing option as per their choice. There are three options to print the number of pages in a document.
- To print all the pages in sequence, choose the option All pages.
- To print a single page, or a number of nonconsecutive pages, choose the option “Pages,” and give the page numbers separated by commas. If you want to print the pages that are consecutive, give the range of pages, first and last (for example, 3-8).
- To print only the selected text, choose the option “Selection.”
Inserting images, characters in a document
The regular text in the document can be made attractive and more informative by inserting the various elements as listed below.
- Inserting image: To insert an image in your document, position the cursor where you want to insert the file, select Insert → Image.
- Inserting special characters: We may require entering the special character, such as ¶, ©, §, √ etc. To do this click on Insert → Special Character.
- Inserting shapes: It is possible to insert various shapes in your document. The variety of shapes consists of Lines, Arrows, Symbols, Stars, Callouts, Flowcharts. To add the shape click on Insert → Shape.
Change the page setting
Page styles define the basic layout of all pages in the document. It includes page size, margins, header and footer, border and background, number of columns, etc.
- Go to Layout or Page Layout
- Adjust:
- Margins
- Orientation (Portrait or Landscape)
- Size (A4, Letter, etc.)
- Adjust:
Bullets and numbering
You can assign the bullets or numbering to the list items in the document by using the options on the Bullets and Numbering toolbar. Bullets starts form expression that include characters and numbering starts form numbers or characters.
Borders and shading
To assign border to the paragraph, select the paragraph, then select Format → Paragraph → Borders → Select Line – Style, Width, Colour.
Creating and managing tables
The representation of data in a tabular format is called as table. In a document it is normally seen that some data are represented in tabular form. example of representing your school timetable, your marksheet, your teachers teaching various subjects. To represent such data, you have to create a table.
- (a) Creating a table: The simplest way to create a table is, click the Table icon on the Standard toolbar or Select Table → Insert Table from the Menu bar or Press Ctrl+F12.
- (b) Inserting rows and columns: To insert one row or column in the table: Choose Insert → Rows Above/Below or Insert → Columns Above/Below. Set number to define the number of rows or columns to be inserted and select the Position as Before or After.
- (c) Deleting rows and columns: To delete one or more rows or columns, place the cursor in the row or column you want to delete and do one of the following:
- (d) Splitting and merging tables: One table can be split into two tables, and two tables can be merged into a single table. Tables can only be split horizontally.
- To split a table – Choose Table → Split Table from the Menu bar.
- To merge two tables – Chose Table and click on Table → Merge Table from the Menu bar.
Digital Presentation
A presentation is a method that we use to convey a topic to an audience. Presentation is used to present the project proposal in business organisations. Presentation is highly used in teaching and training.
Understand the concept of slide shows.
Slide shows help to execute the slides one after another; they help to present information visually. Each slide contains text, images, charts, videos and animation.
Basic elements of a slide
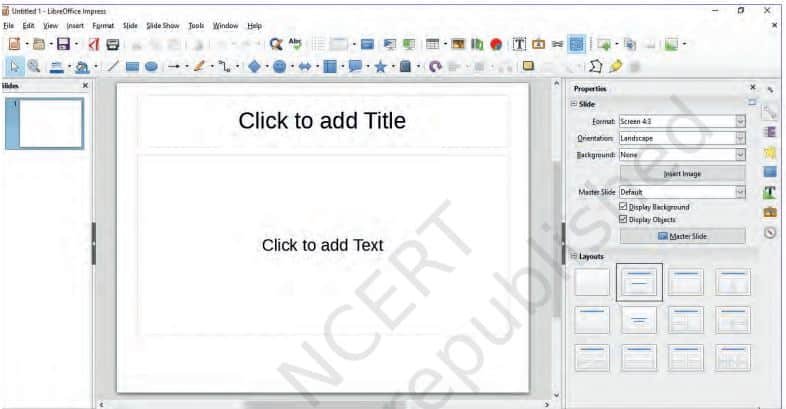
- Title bar – It contains the name of presentation file with extension (.odp) and it is always of the top of the LibreOffice Impress window.
- Menu Bar – It contains the menus with logically grouped commands.
- File: File menu is used to perform basic operations on the presentation (saving, opening creating a new one, etc.).
- Edit: This menu contains functions for copying, cutting and pasting text.
- View: It is used for window view adjustment (different view types are selected, zooming, etc.).
- Insert: This menu is used to insert various objects like tables, shapes, textbox, and charts into a presentation.
- Format: It contains functions for text formatting.
- Slide: It is used to insert new slide, duplicate slide or delete slide.
- Slide show: It is a tool for viewing presentations.
- Tools: They are used to control spelling in a presentation.
- Window: It is used for viewing already opened presentations.
- Help: It is used to see the help of any topic on Impress.
- Various toolbar – There are various toolbar to manage GUI of Impress.
- Standard Toolbar – Each menu of the menu bar are placed here as icons for easy operations.
- Slide pane – It is a vertical pane to see the slide in small size to navigate on any slide easily.
- Workspace: This is the central part of the window, where the presentation slides are created, text is entered, images and other objects are inserted.
- Slides – This is in the left part of the window, display presentation slides in the thumbnail form.
- Tasks pane – Task pane is on the right part of the window. Task pane is made up of five components Master pages, Layouts, Table design, Custom animation and Slide transition.
- Master pages – You can make the presentation base and the common style for all slides.
- Layouts – You can prepare your own layout and keep these safe for future use using this software.
- Table design – This gives styles for creating tables.
- Custom animation – Using this feature you can add, change or remove animation features.
- Slide transition – Using slide transition, you can set the way, how the slide will appear during presentation like speed of transition, sound effects, automated transition, etc.
- Drawing toolbar – Using drawing toolbar, you can make various artistic works in the presentation to make your presentation effective.
- Insertion point – It is a location of the cursor where your text will appear as you type anything (means location where the cursor is blinking).
- Status bar – It displays information about the active presentation, the current position of the cursor and the zoom slider.
- Zoom control – This tool is used to zoom in or zoom out the slide.
Different types of slide layouts
The slide layouts means how text and graphics will be displayed in the slide, just like placeholder boxes with formats. There are six different types of slide layouts, the first slide layout will be ‘blank slide’.
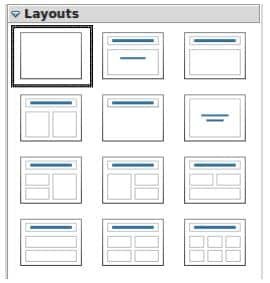
(a) Adding text: To add text to a slide that contains a text frame, click on Click to add text in the text frame and then type your text.
(b) Saving a presentation: While creating a presentation, you can save it to the disk with some name, so that the content may not be lost or to use the presentation further.
(c) Running a slide show: To run the slide show, click Slide Show→Start from First Slide on the main menu bar or Click the Slide Show icon on the Presentation toolbar or the Slide Sorter toolbar or Press F5. The slide show starts to run.
- Saving a presentation as HTML: To publish the presentation on the web you have to save it in HTML format (HyperText Markup Language), which could be opened in any web browser. To save the presentation as html click on File → Export.
- Save a file in PDF format: A Portable Document Format (PDF) of the presentation can be created by saving a file in the PDF format click on File → Export as PDF.
(d) Closing a presentation: To close a presentation, select File Menu→ Close or use the keyboard shortcut keys Ctrl+W.
(e) Using Help: Help function is located in the Help menu. The quickest way to open the Help function is by using the F1 function ke
Create and save a presentation
To Create:
- Open PowerPoint or Google Slides.
- Choose a blank presentation or a template.
- Add slides using Insert > New Slide.
To Save:
- In PowerPoint: File > Save As (choose location and format).
- In Google Slides: Automatically saves to Google Drive.
Different views of a slide set
- Normal view: it is the main view for working with individual slides. This view is used to format and design and to add text, graphics, and animation effects.
- Outline view: it contains all the slides of the presentation in a sequence. It shows each slide in the outline format.
- Notes view: it is used to add notes to a slide for the information of presenter. It is not seen by the audience while showing the presentation.
- Slide Sorter view: it contains all of the slide thumbnails. It is suitable for rearranging the slide order. It is used to sort slides with the ‘drag and drop’ method.
- Handout View: Prepares slides for printing with space for notes.
Inserting an image from a file
To insert an image into presentation, select Insert → Image on the menu bar or, click on the Insert Image icon located on the standard toolbar.
Create Animations
- Select the object (text, image, shape) you want to animate.
- Go to Slide Show > Custom Animation.
- In the right panel, click Add to choose an animation effect (e.g., Entrance, Emphasis, Exit).
- Set the Start option (On click, With previous, After previous).
Add Sound Effects
- Go to Insert > Movie and Sound.
- Choose an audio file (MP3, WAV) from your computer.
- The sound icon will appear on the slide.
- Use Custom Animation to set when and how the sound plays.
Rehearse Timings
- Go to Slide Show > Rehearse Timings.
- The presentation will start in full-screen mode.
- Advance through slides at your desired pace.
- Impress records the time spent on each slide.
- Save the timings when prompted to use them for automated playback.
Spreadsheets
Spreadsheet application is tool which is used to perform all kinds of calculations easily and accurately. A spreadsheet software can store, manipulate, analyse the data and create graphical representations of data easly.
Concept of a worksheet and a workbook
A worksheet is a single page in the spreadsheet; each worksheet contains rows and columns. A workbook is the entire spreadsheet; a workbook contains multiple worksheets.
Entering Data
To enter any data in a worksheet, practically in the cell, it is required to select the cell. The data to be entered can be the label, values or formula.
- Label: Label is the any text entered by using a keyboard. It may combine with letters, numbers, and special symbols.
- Values: The numerical data consisting of only numbers are called values. By default values are right aligned.
- Formulae: Any expressions that begins with an equals ‘=’ is treated as formula.
Note: The values do not display the preceding zero. To show the preceding ‘0’, the data type has to be specified as ‘Text’.
Edit and Format a Worksheet
Editing
- Click a cell to change its content
- Press Delete to clear it
- Use Undo (Ctrl+Z) to reverse changes
Formatting
- Change Colour: Select cell > use Fill Color or Font Color
- Change Font & Size: Use Font dropdown and Size box in toolbar
- Text Alignment: Use Align Left, Center, or Align Right
- Bold/Italic/Underline: Use formatting buttons in the toolbar
Basic functions in Calc
The spreadsheet applications contain different functions to meet the requirements of different fields. The basic commonly used functions are given in the Table:
| Function | Syntax | Use |
|---|---|---|
| SUM | =SUM(N1,N2,….) | Adds the values contained in a range of cells. |
| AVERAGE | =AVERAGE(N1,N2,….) | Finds out the average of the values contained in a range of cell |
| MAX | =MAX(N1,N2,……) | Finds out the largest value contained in a range of cells. |
| MIN | =MIN(N1,N2,……) | Finds out the smallest value contained in a range of cells. |
| COUNT | =COUNT(N1,N2,…..) | Counts the number of cells within a range of cells. |
Creation of Charts Using Spreadsheets
It is not easy to comprehend, compare, analyse or present data when they are represented as numbers. But when data are presented in the form of charts they become an effective tool to communicate.
| Types | Purpose |
|---|---|
| Column Chart | Comparing classes of data items in group. Group comparison |
| Bar Chart | Comparing classes of data items in group. Group comparison |
| Line Chart | Comparing classes of data items in group. Group comparison |
| Pie Chart | Comparing classes of data items as percentage. |
| XY Scatter Chart | Comparing data in pairs |
Let us use the worksheet below to create a column chart
- Follow the steps given below to create charts.
- Select the range of data (A1:F7)
- Insert → Chart
- Select the type of chart
Disclaimer: We have taken an effort to provide you with the accurate handout of “Office Tools Class 9 Notes“. If you feel that there is any error or mistake, please contact me at anuraganand2017@gmail.com. The above CBSE study material present on our websites is for education purpose, not our copyrights.
All the above content and Screenshot are taken from Computer Application Class 9 Code 165 NCERT Textbook published on NCERT Website, CBSE Sample Paper, CBSE Old Sample Paper, CBSE Board Paper and CBSE Support Material which is present in CBSEACADEMIC website This Textbook and Support Material are legally copyright by Central Board of Secondary Education. We are only providing a medium and helping the students to improve the performances in the examination.
Images and content shown above are the property of individual organisations and are used here for reference purposes only. To make it easy to understand, some of the content and images are generated by AI and cross-checked by the teachers. For more information, refer to the official CBSE textbooks available at cbseacademic.nic.in.
