Teachers and Examiners (CBSESkillEduction) collaborated to create the ICT Skills Class 11 Notes. All the important Information are taken from the NCERT Textbook Employability Skills as per the board pattern.
ICT Skills Class 11 Notes


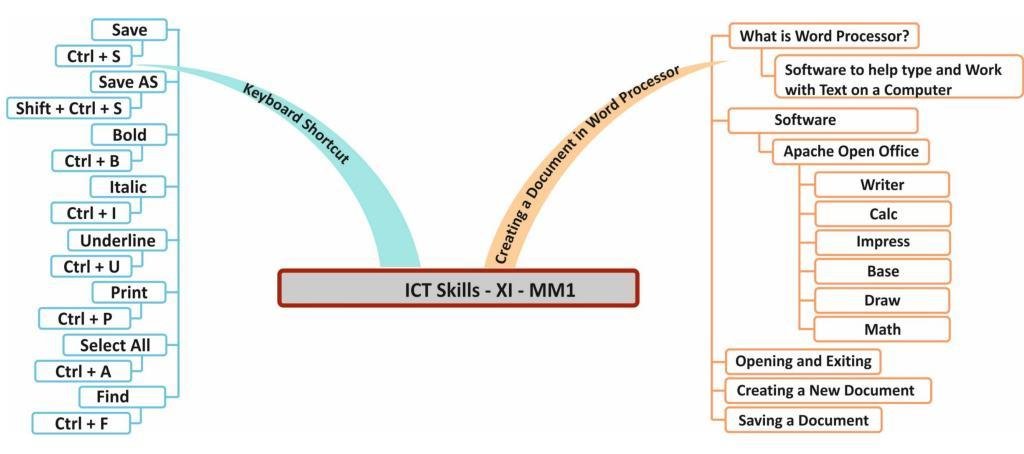
Creating A Document In Word Processor
INTRODUCTION TO WORD PROCESSING
A word processor is a piece of computer software that facilitates typing and working with text. In a word processor, you may generate and save documents like letters, memos, and newsletters. The ability to always open and edit a document is the fundamental benefit of using a word processor to create one. Additionally, you may format it, check for spelling and grammar mistakes, add illustrations and pictures, set page borders, and print it.
SOFTWARE PACKAGES FOR WORD PROCESSING
To make text entry and editing on the computer simple, a number of word processors including Microsoft Word, Open Office Writer, and Star Office have been created. Google Docs, a feature of Google Drive, is a popular example of an online word processor.
Apache OpenOffice
Apache OpenOffice is a free and open-source software that has been developed by the Apache Software Foundation. Apache OpenOffice can be downloaded for free from:
http://www.openoffice.org/
The Apache OpenOffice package contains the following:
- OpenOffice Writer (Word processor)
- OpenOffice Calc (Spreadsheet)
- OpenOffice Impress (Presentation)
- OpenOffice Base (Database Management System)
- OpenOffice Draw (Graphics)
- OpenOffice Math (Equation Editor)
OPENING AND EXITING WORD PROCESSOR
To start OpenOffice Writer, click Start ➢ All Programs ➢ OpenOffice 4.1.5 ➢ OpenOffice Writer.
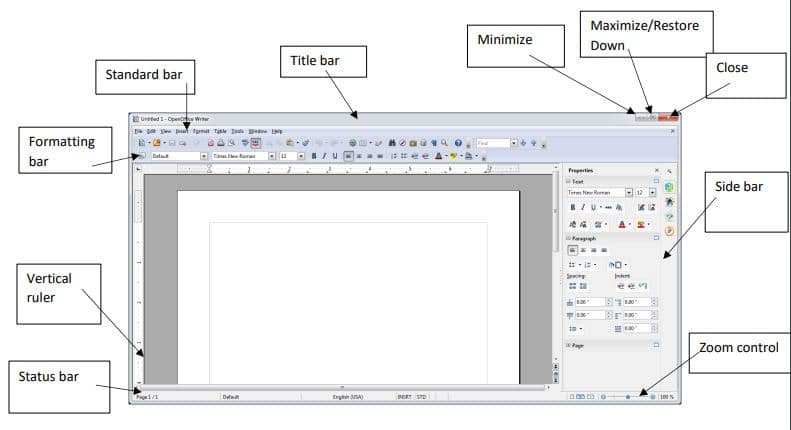
The Apache OpenOffice Writer window, along with its sidebar and other components.

Components of a Calc Screen
- Title bar
- Menu bar
- Standard tool bar
- Formatting bar
- Name box
- Worksheet tab
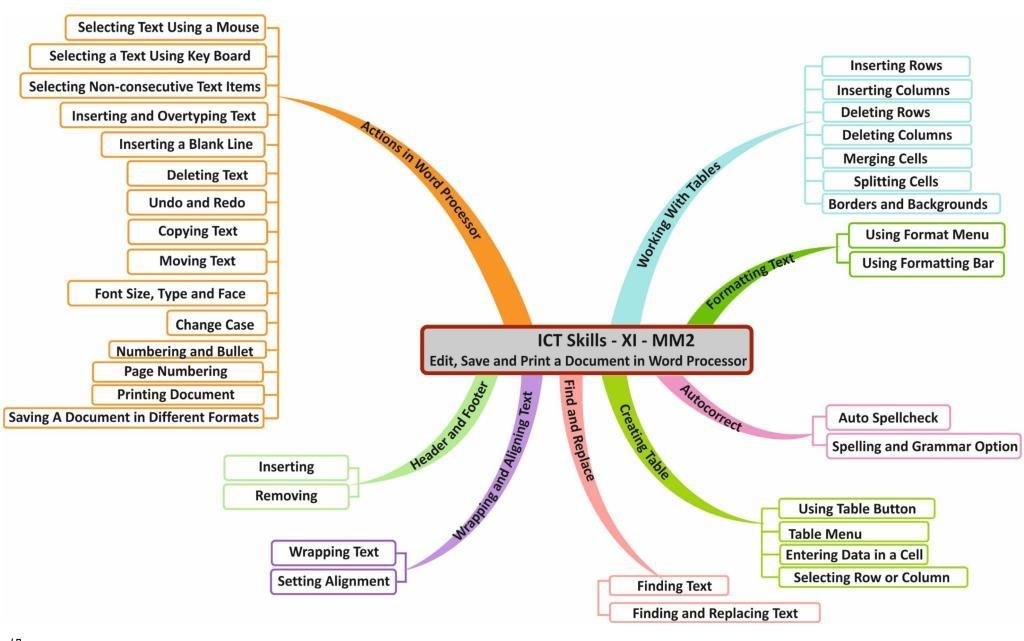
Edit, Save and Print a Document in Word Processor
As we already know, using a word processor to create documents has several benefits. The ability to edit the document whenever we want is one of the primary benefits.
Selecting consecutive text
Selecting Text Using a Mouse
To select text using a mouse, follow the steps:
- Place the cursor to the left of the first character of the text to be selected.
- Press the left mouse button and drag the mouse to the position where you want to end selection.
- Release the mouse button. The selected text gets highlighted in blue color.
Selecting Text Using Keyboard
You can select text using even the keys on your keyboard. First, place the cursor to the left of the first character you wish to select. Then use the following key combinations:
To select Key combinations
- One character to the left Shift +←
- One character to the right Shift + →
- One line up Shift +↑
- One line down Shift +↓
- To the end of the current line Shift + End
- To the beginning of the current line Shift + Home
- To the end of the current document Shift + Ctrl + End
- To the beginning of the document Shift + Ctrl + Home
- Entire document Ctrl + A
Selecting non-consecutive text items
You can also select non-consecutive text in a word processor.
To select non-consecutive text in a document using mouse:
- Select the first text.
- Press and hold down the Ctrl key.
- Select the next text.
- Repeat steps 2 and 3 for other text.
Inserting and Overtyping Text
You can insert (add) text into the existing text or overtype (replace old text with the new one) text in
OpenOffice Writer.
To insert text, press the Insert key, to turn ON the Insert mode, which is indicated by INSRT appearing
on the status bar

Sometimes, you may need to type and replace the current text. This can be done using the Overtype mode. To overtype text, press the Insert key or click on INSRT on the status bar to turn ON the Overtype mode, which is indicated by OVER appearing on the status bar.

Deleting Text
You can easily delete a character, a word, or a block of text in Open Office Writer. Let us learn how to delete a character, a block of text or a word.
To delete a character, the steps are:
- Position the cursor to the left of the character to be deleted.
- Press DELETE.
Or
- Position the cursor to the right of the character to be deleted.
- Press BACKSPACE.
To delete a block of text, the steps are:
- Select the text to be deleted.
- Press DELETE or BACKSPACE.
To delete a word, the steps are:
- Place the cursor to the left of the word to be deleted.
- Press Ctrl + Delete.
Or
- Place the cursor to the right of the word to be deleted.
- Press Ctrl + Backspace.
Undo and Redo Commands
- Undo – The Undo command is used to reverse the last command/action.
- Redo – The Redo command is used to reverse the last Undo action.
Wrapping Text
Text wrapping is a feature that automatically starts a new line when a word in a sequence reaches the border of a picture, a text box, or the margin. There are different options to wrap text around the image.
The steps are:
- Select the image.
- Select Wrap option from the Format menu.
- Select the desired option.
Setting Alignment
The way text is positioned within a page’s margins is known as alignment. Pages in a document can be made appealing and readable by using alignment. The document is more aesthetically pleasing and easier to read when it is properly aligned.
The steps to change the alignment of text are:
- Select the text.
- Select Paragraph option from the Format menu.
- The Paragraph dialog box appears. (Fig 8).
- Select the desired alignment option.
- Click OK.
FONT SIZE, TYPE AND FACE
The ability to alter the size, colour, and style of the text is another benefit of word processing software. The process of formatting involves altering the way that text appears in a document by using different fonts, font colours, font sizes, etc.
Formatting Text
Text Formatting Using the Format Menu
- Select the text.
- Click the Format menu bar and then select Character option. The Character dialog box appears.
- You can change the font, font size, and typeface using the Font tab in the dialog box.
- Click on the Font Effects tab to change the font color, font effect, and apply other styles such as underlining.
- You can change the position of the text (e.g., superscript, subscript, etc.) using the Position tab
- Click OK after choosing the desired options.
Change Case
There are instances when you begin typing in uppercase, only to realise that you meant to type it in lowercase, or vice versa. Use the Alter Case option to change the case of the text instead of typing the entire sentence over. The actions are:
- Select the Change Case option from the Format menu.
- Select the desired option in the submenu.
- Sentence case – The first character in a sentence is capitalized and the rest are in lowercase.
- lowercase – All characters are in lowercase (small letters)
- UPPERCASE – All characters are in uppercase (capital letters)
- Capitalize – Every Word The first character of each word is capital and the rest are in lowercase
- tOGGLE cASE – Changes lowercase characters to uppercase and uppercase characters to lowercase
HEADER AND FOOTER
A document’s header is the text that appears at the top of each page (in the top margin). Each page has a footer that is printed at the bottom (in the bottom margin).
Additional information about the document, such as the date and page number, is provided in the headers and footers.
- Select Insert ➢ Header or Footer ➢ Default.
- The header area appears at the top of the document. Type the header.
Or
- Select Page option from the Format menu.
- The Page Style: Default dialog box appears.
- Click the Header tab or the Footer tab.
- A box will appear at the top and the bottom area of the page, respectively.
- You can either type text or add date and time by selecting the Fields option in the Insert menu.
- Click in the document area to finish adding header or footer information.
To remover header of footer, the steps are:
- Select Insert ➢ Header or Footer ➢ Default.
- A message box appears.
- Click Yes to delete the header or footer.
AUTOCORRECT
One of the major benefits of writing a text on a word processor is that we can quickly identify any spelling or grammar errors we made while typing. These can be quickly fixed by using the word processor’s features. OpenOffice Writer documents have wavy lines beneath the text that are either red or blue. A wavy line denotes a grammatical error, and a red wavy line denotes a misspelt word.
OpenOffice Writer provides the following two ways of checking spelling and grammar in a document:
- Using AutoSpellcheck
- Using the Spelling and Grammar option
Using AutoSpellcheck
The steps to check spellings as you type are:
- Click the AutoSpellcheck button on the Standard bar.
- Right-click the misspelled word (with a red wavy underline) and then choose a word from the suggested list
Or
- from the AutoCorrect submenu. If you choose a word from the AutoCorrect submenu, the misspelled and the replacement words are automatically added to the AutoCorrect list for the current language.
Using the Spelling and Grammar Option
The Spelling & Grammar option of OpenOffice Writer helps you check the spelling and grammatical errors in your document. The steps are:
1. Select the Spelling and Grammar option from the Tools menu.
Or
Click the Spelling and Grammar button on the Standard bar.
Or
Press F7
- The Spelling dialog box appears.
- The unrecognized word is displayed in the Not in Dictionary text box and the suggestions are displayed in the Suggestions box.
- On clicking the desired button, the respective action takes place and the next word is highlighted.
- Repeat this step until a message box saying The spell check is complete is displayed.
- Click OK.
NUMBERING AND BULLET
Using a list, you can arrange the contents in a document. This makes it simple for the reader to comprehend the main ideas. Step-by-step instructions to a succession of points can be created in lists. A numbered or bulleted list can be created using a word processor.
To create a bulleted or numbered list, do as follows:
- Place the cursor at the position where you want to start the list.
- Select Bullets and Numbering option from the Format menu.
- The Bullets and Numbering dialog box appears.
- Click the Bullets tab or the Numbering type tab.
- Choose the desired style and click OK.
- Type the list item. After typing each list item, press the Enter key
CREATING TABLE
Information can be displayed as tables in a document. A tabular arrangement makes information easier to read or deliver. A table is a collection of rows and columns of data. Information is organised into rows and columns using tables in word processors. A table like the one in your class is called a table.
- In a table, a column is a row of cells arranged vertically.
- In a table, a row is a horizontal row of cells.
- A rectangular box known as a cell is created by the junction of a row and a column.
Tables can be created in OpenOffice Writer in any one of the following ways:
- Using Table button
- Using Table menu
Creating a Table Using the Table Button
The steps to create a table using the Table button are:
- Click the drop-down menu arrow of the Table button on the Standard bar.
- A grid of cells appears. Move the mouse pointer in the grid to highlight the number of rows and columns required in the table.
- A table will be inserted at the insertion point.
Creating a Table Using the Table Menu
The steps to create a table using the Table menu are:
- Select Table ➢ Insert ➢ Table.
Or
Press Ctrl + F12.
Or
Select Insert ➢ Table
- The Insert Table dialog box appears.
- Specify the number of columns
- Specify the number of rows
- Click OK
Inserting Rows
You can easily insert (add) new rows in a table in a Writer document. The steps to insert rows in a table are:
- Position the cursor in the cell where you want to insert a new row or a column.
- Select Table ➢ Insert ➢ Rows.
- The Insert Rows dialog box appears .
- Specify the number of rows to be inserted.
- Select the position – Before or After the selected row.
- Click OK.
Inserting Columns
Columns can also be inserted in a document. The steps to insert columns in a table are:
- Position the cursor in the cell where you want to insert a new column.
- Select Table ➢ Insert ➢ Columns.
- The Insert Columns dialog box appears.
- Specify the number of columns to be inserted.
- Select the position – Before or After the selected column.
- Click OK.
Deleting Rows
To delete rows in a table:
- Select the rows to be deleted.
- Select Table ➢ Delete ➢ Rows.
Deleting Columns
To delete columns in a table:
- Select the columns to be deleted.
- Select Table ➢ Delete ➢ Columns.
Merging the Cells of the table
You can also merge (combine) cells in a table. The steps are:
- Select the cells to be merged.
- Select Table ➢ Merge cells.
Splitting the Cells of the table
You can split (divide) a cell into required number of rows or columns. The steps are:
- Click in the cell to be split.
- Select Table ➢ Split Cells.
- The Split Cells dialog box appears (Fig. 29).
- Enter the number of parts in which you want to split the selected cell.
- Specify the direction—Horizontally or Vertically—in which you want to split the cell.
- Click OK.
Applying Borders and Background to the table
You can apply borders and background color to the entire table or selected cells of the table. The steps to apply borders and background to a table are:
- Select the table or rows/columns/cells.
- Select Table ➢Table Properties.
- The Table Format dialog box appears
- Click the Borders tab. Select the line style and line color.
- Click the Background tab. Choose the desired background color.
- Click OK.
PAGE NUMBERING
You can add page numbers in the header or footer area. The steps are.
- Click in the header or footer area.
- Select Insert➢ Fields ➢ Page Number.
PRINTING DOCUMENT
To print a document, do the following:
- Select Print option from File menu.
Or
Click the Print button on the Standard bar.
- The Print dialog box appears.
- Select the printer.
- Specify the range of pages to be printed.
- Specify the number of copies to be printed.
- Click the Print button
SAVING A DOCUMENT IN DIFFERENT FORMATS
You have already learnt how to save a document in OpenOffice Writer. If you want to save a file in a different format other than the default format .odt of OpenOffice Writer. The Steps are:
- Select Save As option of File menu.
- The Save As dialog box appears.
- Select the File type from the Save as type drop-down list.
- Type the filename.
- Click Save button.

Good